Scale Modeling Mania
Sure, it's possible I'm type-A anal, it's equally possible you're sloppy.
Home
Gallery
Two OLD builds
F-106A Delta Dart (Monogram) 1/48; 5th FIS Markings
F-5F Tiger II (Monogram) 1/48; 527th Tactical Fighter Training Aggressor Squadron Markings
Gemini (Revell) 1/24 scale
FT17 (Meng) 1/35 Scale
M3 Stuart (Academy) 1/35 scale
M4 (Tamiya) 1/35 Scale
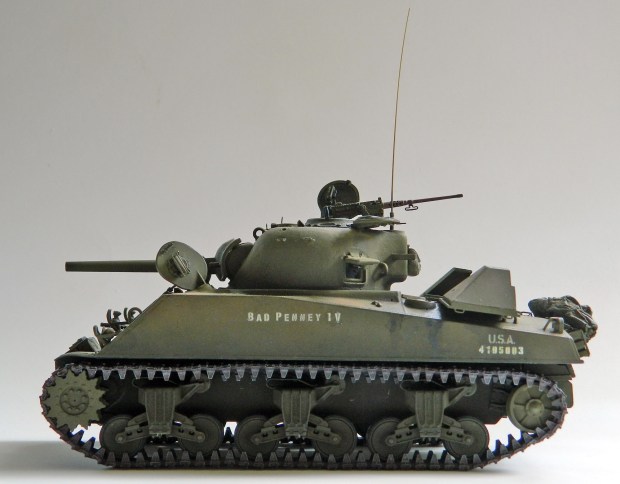
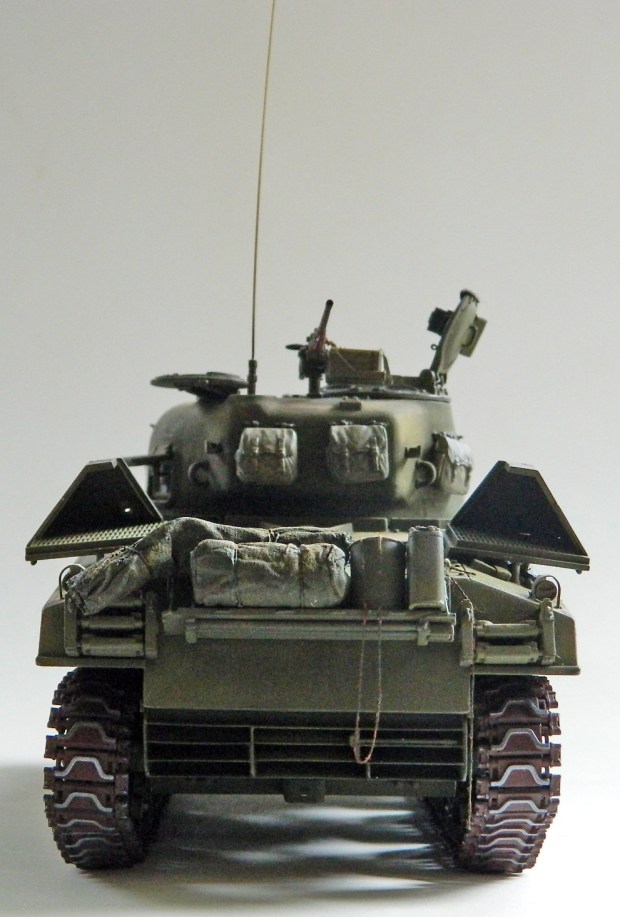
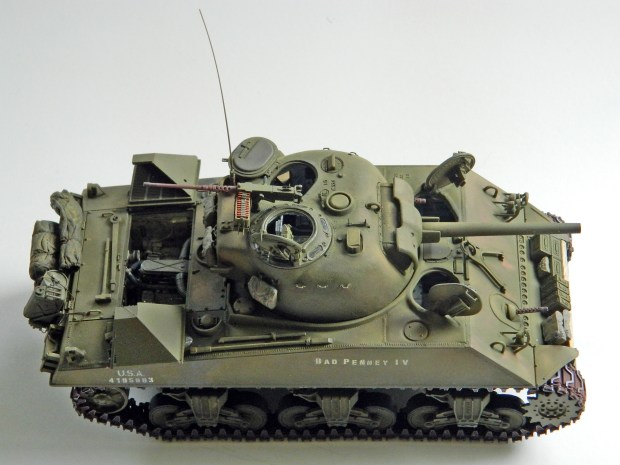
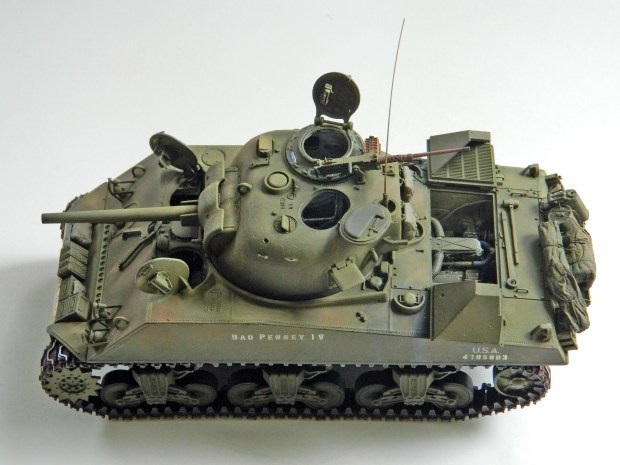
M4A3 75(W) (Tamiya) 1/35 scale
M24 Chaffee (Bronco) 1/35 scale
P-38F (Tamiya) 1/48 Scale
P-51 (Accurate Miniatures) 1/48 Scale
A-37B Dragonfly (Trumpeter) 1/48 scale
SR-71A Blackbird (Testors) 1/48 scale
Bugatti Type 35B (Monogram) 1/24 Scale
F7F-3 (AMT/Ertl) 1/48 Scale
Grumman JRF Goose (Czech Model) 1/48 Scale
Behind the Scenes
Aircraft 1/48
Jets
A-37B Dragonfly (Trumpeter)
Supertweet – A Brief Overview
A-37B (Trumpeter) after-action report
A-37B Dragonfly (Trumpeter) Build #1 – Parts layout and the start
A-37B Dragonfly (Trumpeter) Build #2 – Cockpit Painting, Detailing, and Fuselage Assembly
A-37B Dragonfly (Trumpeter) Build #3 – Working on the Engine Intakes and Exhausts and Confidence Bites Me on the Ass
A-37B Dragonfly (Trumpeter) Build #4 – Wings are Assembled, Installed, and Smaller Items Go On
A-37B Dragonfly (Trumpeter) Build #5 – Small Items Added and a HUD Wrestled With
A-37B Dragonfly (Trumpeter) Build #6 – More Small Items Added and Ready for Paint
A-37B Dragonfly (Trumpeter) Build #7 – Painting Begins
A-37B Dragonfly (Trumpeter) Build #8 – Painting Concludes as Does Decaling
A-37B Dragonfly (Trumpeter) Build #9 – Staining, More Painting, Final Assembly, and DONE
SR-71 Blackbird (Testors)
SR-71 Blackbird – A Brief Overview
SR-71A Blackbird (Testors) after-action report
SR-71A Blackbird (Testors) Build #1 – The parts and the nose landing gear bay
SR-71A Blackbird (Testors) Build #2 – Some Nose Gear Details
SR-71A Blackbird (Testors) Build #3 – Work on the Cockpits and Canopies
SR-71A Blackbird (Testors) Build #4 – More Work on the Cockpits, Canopies, and Scribing Lines
SR-71A Blackbird (Testors) Build #5 – Continuing Work on the Cockpits
SR-71A Blackbird (Testors) Build #6 – Wrapping Up the Cockpits
SR-71A Blackbird (Testors) Build #7 – Painting and Installing Cockpits
SR-71A Blackbird (Testors) Build #8 – Back to the Nose Gear Bay
SR-71A Blackbird (Testors) Build #9 – Nose Gear Bay Gets Populated & Scribing “Fun”
SR-71A Blackbird (Testors) Build #10 – Some Fuselage Details & the Nose Gear Gets Built
SR-71A Blackbird (Testors) Build #11 – Starting the Main Landing Gear Bays
SR-71A Blackbird (Testors) Build #12 – Starting the Main Landing Gear
SR-71A Blackbird (Testors) Build #13 – Main Landing Gear Continues; Bays Get Stuff Stuffed
SR-71A Blackbird (Testors) Build #14 – Bays and Main Landing Gear Done For Now
SR-71A Blackbird (Testors) Build #15 – Fuselage Gets Assembled and I Get a Right Proper Scare
SR-71A Blackbird (Testors) Build #16 – Fuselage Gets Tedious Attention
SR-71A Blackbird (Testors) Build #17 – Fuselage Tedium Continues…as Does Another Scare
SR-71A Blackbird (Testors) Build #18 – Fuselage Tedium Continues…With a Much-appreciated Detour on the Engine Nacelles
SR-71A Blackbird (Testors) Build #19 – Engine Nacelles Get Some Attention
SR-71A Blackbird (Testors) Build #20 – Engine Nacelles Done and Afterburners Added
SR-71A Blackbird (Testors) Build #21 – A Myriad of Small Tasks to Ready the Build for Paint
SR-71A Blackbird (Testors) Build #22 – Not Quite a Myriad of Small Tasks and Ready for Paint
SR-71A Blackbird (Testors) Build #23 – Not Quite Ready for Paint and Decals Kick My Ass
SR-71A Blackbird (Testors) Build #24 – Not Quite Ready for “Good Enough” & I kick back
SR-71A Blackbird (Testors) Build #25X – A Pause in the Action
SR-71A Blackbird (Testors) Build #26 – Wherein the Action Resumes and I am Reminded of Things One Should NOT Forget…Ever
SR-71A Blackbird (Testors) Build #27 – The Best-laid Mice of Plans and Men
SR-71A Blackbird (Testors) Build #28 – The Homestretch and the Finish
Propeller-driven
F7F
F7F-3 (AMT/Italeri) A Brief Overview
F7F-3 (AMT/Ertl) After-action Report
F7F-3 (AMT/Italeri) Build #1 – The Parts and a LOT of Things to Add Weight
F7F-3 (AMT/Italeri) 1/48 Scale Build #2 –Continuing to Populate the Engine Nacelles
F7F-3 (AMT/Italeri) 1/48 Scale Build #3 –Continuing to Populate the Engine Nacelles Some More
F7F-3 (AMT/Italeri) 1/48 Scale Build #4 –Engines Get Painted, the Landing Gear Bays and Landing Gear are Pre-shaded, and the Landing Gear is Installed
F7F-3 (AMT/Italeri) 1/48 Scale Build #5 – Finishing the Engine Nacelles, Landing Gear, and Starting the Cockpit…Where Things Get Tedious
F7F-3 (AMT/Italeri) 1/48 Scale Build #6 – Starting work the Cockpit…Where Things Get VERY Tedious
F7F-3 (AMT/Italeri) 1/48 Scale Build #7 – Finishing the Cockpit, Joining Fuselage Halves, and Finally Dealing With Scribing “Fun”
F7F-3 (AMT/Italeri) 1/48 Scale Build #8 – Finishing the Fuselage, Making Clear lights, and Attending to the Final Details Before Assembly Starts
F7F-3 (AMT/Italeri) 1/48 Scale Build #9 – Whereby I Learn Things That I thought I Already Knew, Then Chasing Myself, Then Fixing Far Too Many Things…a Lot…and Assembly Wraps up and DONE
Grumman JRF Goose
Grumman JRF Goose (Czech Model) – A Brief Overview
Grumman JRF Goose (Czech Model) 1/48 Scale
Grumman JRF Goose (Czech Model) 1/48 Scale Build #1 – Parts Layout and the First of Much Work Begins
Grumman JRF Goose (Czech Model) 1/48 Scale Build #2 – Fit…Dealing with Lousy Fit and Having Several Fits
Grumman JRF Goose (Czech Model) 1/48 Scale Build #3 – Doing What is Necessary to Get the Fuselage Halves Married
Grumman JRF Goose (Czech Model) 1/48 Scale Build #4 – I Get to See Just How Poorly this All Fits Together
Grumman JRF Goose (Czech Model) 1/48 Scale Build #5 – I Pick Up Where I Left Off
Grumman JRF Goose (Czech Model) 1/48 Scale Build #6 – And This is When Tedium Really Sets In
Grumman JRF Goose (Czech Model) 1/48 Scale Build #7 – Staggering Towards the Finish…and Getting There
P-38F – Tamiya
P-38F (Tamiya) A Brief Overview
P-38F (Tamiya) After-action Report
P-38F (Tamiya) Build #1 – The Parts and Construction Goes Quickly Because of EXCELLENT Parts Fit
P-38F (Tamiya) Build #2 – Painting Parts and Preparing to Paint
P-38F (Tamiya) Build #3 – Painting, Decals, Final Assembly, and Done
P-51 – Accurate Miniatures
Mustang – A Brief Overview
P-51 (Accurate Miniatures) after-action report
P51 (Accurate Miniatures) Build #1 – Parts Layout, Copying Parts, and Wing Modification
P51 (Accurate Miniatures) Build #2 – Working Cockpit Parts, Adding Details
P51 (Accurate Miniatures) Build #3 – Scratchbuilding Landing Gear Bays and Readying Them for Molding
P51 (Accurate Miniatures) Build #4 – Casting Landing Gear Bay in Resin, Fixing Errors, Adding Details
P51 (Accurate Miniatures) Build #5 – Cockpit Work
P51 (Accurate Miniatures) Build #6 – Fixing Cockpit Detail Errors, Canopy Fitting
P51 (Accurate Miniatures) Build #7 – Cockpit Details and Painting, Landing Gear Bays Painted
P51 (Accurate Miniatures) Build #8 – Cockpit Details, Molding Tailwheel, Detailing Main Landing Gear, Painting Landing Gear, Installing Cockpit, Joining Fuselage Halves
P51 (Accurate Miniatures) Build #9 – Fixing Gaps, Making Landing Lights, Gun Details, Making More Accurate Flaps
P51 (Accurate Miniatures) Build #10 – Flaps Finished, Formation Lights Built, Landing Gear Bays Attached, Wing Tops Attached
P51 (Accurate Miniatures) Build #11 – Flap Problems, Wings, Elevators, Belly Scoop Attached
P51 (Accurate Miniatures) Build #12 – Making Things Fit, Replacing Lost Details, Reworking Incorrect Panel Lines, Canopy Work
P51 (Accurate Miniatures) Build #13 – Wrestling With Landing Lights, Replacing Propeller
P51 (Accurate Miniatures) Build #14 – An Inattentive Error Sidelines the Build For Now
P51 (Accurate Miniatures) Build #15 – Adventures in Forensic Modeling…Picking Up Where I Left Off
P-51 (Accurate Miniatures) Build #16 – Painting, Final Details, and DONE
Spacecraft
Actual
Gemini Program – A Brief Overview
Gemini (Revell) After-action Report
Gemini (Revell) Build #1 – Parts layout and the start
Gemini (Revell) Build #2 – Starting on the PE interior parts
Gemini (Revell) Build #3 – Cleaning up exterior seams and more interior work
Gemini (Revell) Build #4 – Interior work (and a bazillion little tiny switches)
Gemini (Revell) Build #5 – Interior work; adding missing details on the seats
Gemini (Revell) Build #6 – Interior work; finishing seat details and discovering major surgery is required to make them fit
Gemini (Revell) Build #7 – Interior work; last seat details added and making harnesses
Gemini (Revell) Build #8 – Adding interior details (most notably the artificial horizons), discovering the surgery and exterior were botched, fixing said botches
Gemini (Revell) Build #9 – Fixing exterior details, adding washers & rivets, starting work on hatches
Gemini (Revell) Build #10 – Finishing hatches and adding interior details
Gemini (Revell) Build #11 – Finishing the instrument panel, adding more interior details, painting the interior
Gemini (Revell) Build #12 – Finishing seat details, assembling the interior, discovering it doesn’t fit and fixing that, adding exterior resin details (and discovering they’re garbage), adding the retrorocket module
Gemini (Revell) Build #13 – Discovering *more* garbage exterior details and fixing that, adding panels and rivets to the retro and service modules, first paint job which went horribly wrong and fixing *that*
Gemini (Revell) Build #14 – Adding decals, fixing paint, opening hatches, fixing paint, fixing more garbage resin, fixing paint, building the display stand, and FINISHED
Fictional
Colonial Viper-MkII
Colonial Viper MkII (Moebius Models) 1/32 Scale Build #1, Part 1 – Parts Layout and the Start
Colonial Viper MkII (Moebius Models) 1/32 Scale Build #1, Part 1 Conclusion – Making Things Fit Better
Armor
Light Tanks
FT-17 (Meng)
Renault FT-17 – A Brief Overview
FT17 (Meng) After-Action Report
FT-17 (Meng) Build #1 – Parts Layout, Assembling Tracks, and Marking Time Awaiting Parts
FT-17 (Meng) Build #2 – PE Parts Arrive and Time is Consumed with Small Parts
FT-17 (Meng) Build #3 – The Interior Gets Paint & Things Start Going Together
FT-17 (Meng) Build #4 – The Exterior Gets Paint & Things Really Start Going Together…and Done
M3 Stuart (Academy)
Stuart – A Brief Overview
M3 Stuart (Academy) After-action Report
M3 Stuart (Academy) Build #1 – Parts Layout, Assembling Tracks, and Making Resin Parts Fit
M3 Stuart (Academy) Build #2 – Adding Rivets, Fixing a Mistake, LED Placement, and Backdating the Turret
M3 Stuart (Academy) Build #3 – Finding a Home for the Battery and Getting Details Prepared for Paint
M3 Stuart (Academy) Build #4 – Painting and Interior Assembly Begins and a Minor Tragedy Happens and is Fixed
M3 Stuart (Academy) Build #5 – Dealing With Disappointing Fit and Tedious Details
M3 Stuart (Academy) Build #6 – Dealing With Tedious Details and Being Adaptable
M3 Stuart (Academy) Build #7 – Final Paint, Decals, Pastels, and DONE
M24 Chaffee (Bronco)
Chaffee – A Brief Overview
M24 Chaffee (Bronco) after-action report
M24 Chaffee (Bronco) 1/35 Scale Build #1 – The Parts and Hull Construction Begins
M24 Chaffee (Bronco) 1/35 Scale Build #2 – Getting the Engines Ready for Paint
M24 Chaffee (Bronco) 1/35 Scale Build #3 – Painting…Kind of
M24 Chaffee (Bronco) 1/35 Scale Build #4 – Small Details…Many, and a Useful Track Trick.
M24 Chaffee (Bronco) 1/35 Scale Build #5 – More Small Details
M24 Chaffee (Bronco) 1/35 Scale Build #6 – Small Details Find a Home and More Small Details are Produced
M24 Chaffee (Bronco) 1/35 Scale Build #7 – Finishing the Interior of the Turret, Gluing it Closed, and Some Hull Details
M24 Chaffee (Bronco) 1/35 Scale Build #8 – Dealing With Suspension, Tracks, Adding LOTS of Small Details, Wrestling With Decals, and DONE!
Medium Tanks 1/35 Scale
M4 (Tamiya)
Tamiya M4 After-action Report
M4 (Tamiya) Build #0 – Behind the Scenes of Behind the Scenes…What I Want to do Before I can do That
M4 (Tamiya) Build #1 – Parts Layout and Thinking Crazy Thoughts…and Then Acting On Them
M4 (Tamiya) Build #2 – Assembling Bits for the Lower Hull Continues and I Find Out That Proper Fit Will be Challenging
M4 (Tamiya) Build #3 – Assembling Bits for the Lower Hull Continues and I Ponder Tamiya’s Willingness to Utterly Ignore the Underside of Things
M4 (Tamiya) Build #4 – Assembling Bits for the Lower Hull Continues and I’m Reminded That Sometimes Things Work and Sometimes They Do Not
M4 (Tamiya) Build #5 – Assembling the Lower Hull is Mostly Completed and then Painted, Stained, and Worn, the Upper Hull is Fitted, and I Finally Get to Fit the Engine Into the Lower Hull
M4 (Tamiya) Build #6 – Finishing the Engine, Engine Bay, and Discovering That Another Clever Idea for the Turret Simply Will Not Work, and Then Figuring Out What to do Instead
M4 (Tamiya) Build #7 – Finishing the Gimmick of See-Through Panels, Getting Started on the Turret Basket, and MAKING that Sodding Upper Hull Fit to the Lower Hull
M4 (Tamiya) Build #8 – Work on the Turret Continues With Me Finding a Glaring Flaw, Fixing it, and More Tiny Stuff
M4 (Tamiya) Build #9 – More Work on the Turret Continues With Even More Tiny Stuff
M4 (Tamiya) Build #10 – Wrapping Up Turret Work, Getting the Suspension Sorted, and Starting on Hull Details
M4 (Tamiya) Build #11 – Finishing the Turret, Dealing With Tracks and My Mistaken Assumption, More Hull Details, and a Concerted Stagger to the Finish
M4A3 (Tamiya)
Sherman – A Brief Overview
Tamiya M4A3 after-action report
M4A3 (Tamiya) Build #1 – Parts Layout and Constructing the Engine
M4A3 (Tamiya) Build #2 – Fixing the Radiator Bulkhead and Constructing the Engine
M4A3 (Tamiya) Build #3 – Fixing Fit Problems and Dry-Fitting the Engine Bay
M4A3 (Tamiya) Build #4 – Finishing the Radiator Bulkhead and Building Ducting
M4A3 (Tamiya) Build #5 – Finishing the Ducting, Making the Rear Bulkhead Fit, and Filling Holes
M4A3 (Tamiya) #6 – Dry-Fitting the Interior, Fixing Some Exterior Details, Adjusting Interior and Engine Bay Parts to Fit
M4A3 (Tamiya) Build #7 – Fixing Warped Resin and Experimenting With Salt Chipping
M4A3 (Tamiya) Build #8 – More Tiny Engine Details, Interior Construction Begins
M4A3 (Tamiya) Build #9 – Reworking Front Hatches, Copying a Pistol Port, Cutting Away Engine Covers, Adding Engine Bay Details
M4A3 (Tamiya) Build #10 – Correcting Exterior Details, Painting the Engine, Adding Wear to Road Wheels and Painting Them
M4A3 (Tamiya) Build #11 – Experimenting with Staining, Adding Details to Interior Parts, and Painting Interior Parts
M4A3 (Tamiya) Build #12 – Salt-Chipping and Painting Interior, Gluing and Staining the Interior, Adding and Painting the Engine Bay, Installing Engine, and Gluing Rear Bulkhead in Place
M4A3 (Tamiya) Build #13 – Deciding on Front Hatches and Correcting Vent Cover
M4A3 (Tamiya) Build #14 – Turret Work, Periscope Surgery, Grafting the Pistol Port to the Turret
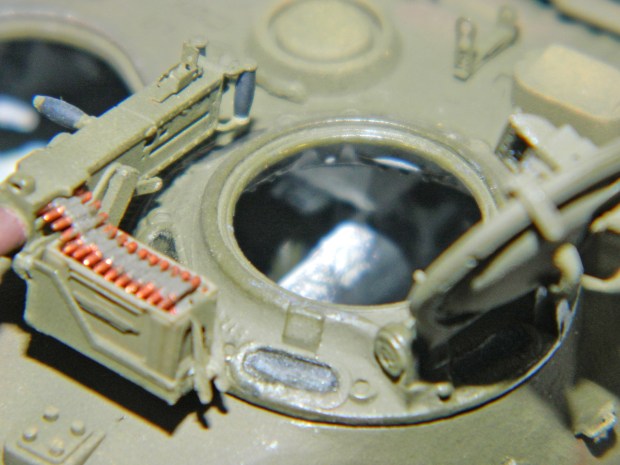
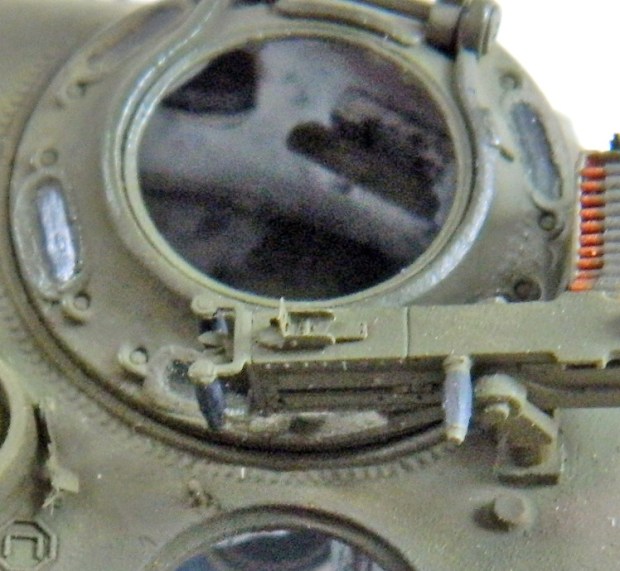
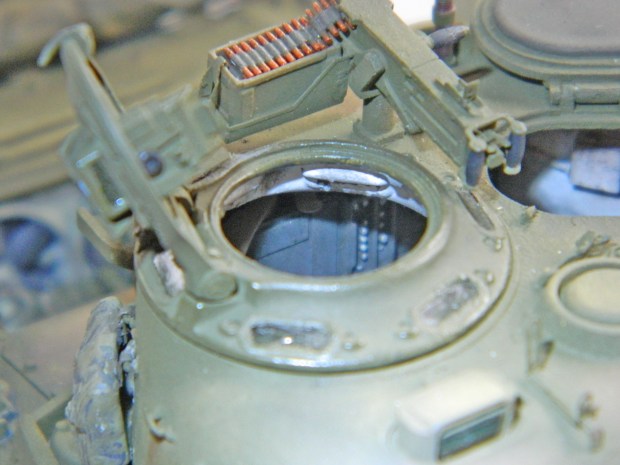
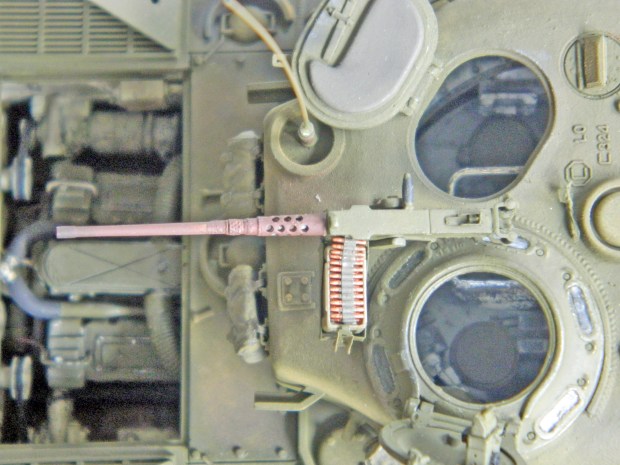
M4A3 (Tamiya) Build #15 Brass Machine Gun Barrels, “Fun” with the Bow Gun, More Periscope Surgery, Adding the Main Gun Barrel and Creating Trunion Mounts, Mantle Surgery, Many Turret Details
M4A3 (Tamiya) Build #16 – Turret Interior Detailing, Painting, and Staining, Painting Misc. Details
M4A3 (Tamiya) Build #17 Turret Painting, Assembling Commander’s Hatch & Cupola, Adding Turret Cheek Armor, Misc. Turret Exterior Details
M4A3 (Tamiya) Build #18 – Turret Exterior Painted, Fixing Exterior Details, Building Tracks, Creating Vent Blower
M4A3 (Tamiya) Build #19 – Detailing .50 Cal, Making Vent Assembly Mold, and Casting it
M4A3 (Tamiya) Build #20 – Assembling Vent Blower and Installing it, Copying Turret Interior Parts, Working Exterior Details
M4A3 (Tamiya) Build #21 – Installing Bow Gun, Attaching Hull Top and Making Exterior Details Fit
M4A3 (Tamiya) Build #22 – Correcting Exterior Details, Fun with Track Links (Part 1)
M4A3 (Tamiya) Build #23 – Readying the Exterior for Paint
M4A3 (Tamiya) Build #24 – Adding Details and the First Coat of Primer
M4A3 (Tamiya) Build #25 – Final Painting Begins
M4A3 (Tamiya) Build #26 – Fun with Tracks (Part 2), Painting Exterior Details
M4A3 (Tamiya) Build #27 – Tracks Finally Installed and Markings are Added
M4A3 (Tamiya) Build #28 – Weathering and Staining
M4A3 (Tamiya) Build #29 – Final Details added and Completion
Cars
Bugatti Type 35B – Monogram
Bugatti Type 35B – A Brief Overview
Bugatti Type 35B (Monogram) After-Action Report
Bugatti Type 35B (Monogram) Build #1 – Parts Layout and Getting Started
Bugatti Type 35B (Monogram) Build #2 – With No Particular Build Order, I Wander All Over the Place…and Then REALLY Give Myself Something to Do
Bugatti Type 35B (Monogram) Build #3 – Working With Really Small Details…and Then REALLY Give Myself Something to Do AGAIN
Bugatti Type 35B (Monogram) Build #4 – More Frame Breakage and Repair, and Starting Bodywork
Bugatti Type 35B (Monogram) Build #5 – Bodywork and More Bodywork, with Really Small Details to Provide Diversity
Bugatti Type 35B (Monogram) Build #6 – The Cockpit Gets Attention, with PLENTY of Really Small Details to Provide Even More Diversity
Bugatti Type 35B (Monogram) Build #7 – All the Tiny Details Leading Up to Paint
Bugatti Type 35B Build #8 – All the Tiny Details Remaining are Wrestled With Leading to Assembly and DONE
Crankenstein
Crankenstein – 1/25 Scale Kitbash Build #1
Crankenstein – 1/25 Scale Kitbash Build #2 Starting to Figure Out Where Things Go…and Wondering How to Get There From Here
Crankenstein – 1/25 Scale Kitbash Build #3 Extending the Body and Coming to a New Understanding of the Scope of This
Crankenstein – 1/25 Scale Kitbash Build Paused
Side Projects
Casting & Molding
Degassing Pump/chamber
Making the Pump
Getting a Better Pump
Making the Vacuum Chamber
Pressure Casting
Vacuum Molder
Opinions, Reviews, & Tips
A Big, Steamy, Cup of Disappointment. My Experiences with Eduard’s Limited-Edition Early P-38 Kit. It Ain’t Pretty.
A Word About How Tools Affect the Work
Airbrushes
Black Magick
Build Philosophy and How To Learn
Going From Point Z to Point A
MiniArt #35321 Continental R975 Radial Tank Engine Review
Needs versus Wants
The Monsters
Old Dog, New Tricks, and 3D Printing
The Carpet Monster and the Interdimensional Portal
Working Resin Aftermarket Sets
What the Hell Does That Mean?
Decals and Dry-Transfers
Glossary of Terms
Degassing – What Is It and Why Do I Need It?
What does “a wash” mean?
M4A3 75(W) (Tamiya) 1/35 scale
Share this:
Share on X (Opens in new window)
X
Share on Facebook (Opens in new window)
Facebook
Like
Loading...
Recent Posts
Colonial Viper MkII (Moebius Models) 1/32 Scale Build #1, Part 1 Conclusion – Making Things Fit Better
Colonial Viper MkII (Moebius Models) 1/32 Scale Build #1, Part 1 – Parts Layout and the Start
Grumman JRF Goose (Czech Model) After-Action Report
Grumman JRF Goose (Czech Model) 1/48 Scale
Grumman JRF Goose (Czech Model) 1/48 Scale Build #7 – Staggering Towards the Finish…and Getting There
FT-17 (Meng) Build #4 – The Exterior Gets Paint & Things Really Start Going Together…and Done
Search
Subscribe
Subscribed
Scale Modeling Mania
Join 44 other subscribers
Sign me up
Already have a WordPress.com account?
Log in now.
Scale Modeling Mania
Subscribe
Subscribed
Sign up
Log in
Copy shortlink
Report this content
View post in Reader
Manage subscriptions
Collapse this bar
Loading Comments...
Write a Comment...
Email (Required)
Name (Required)
Website
%d