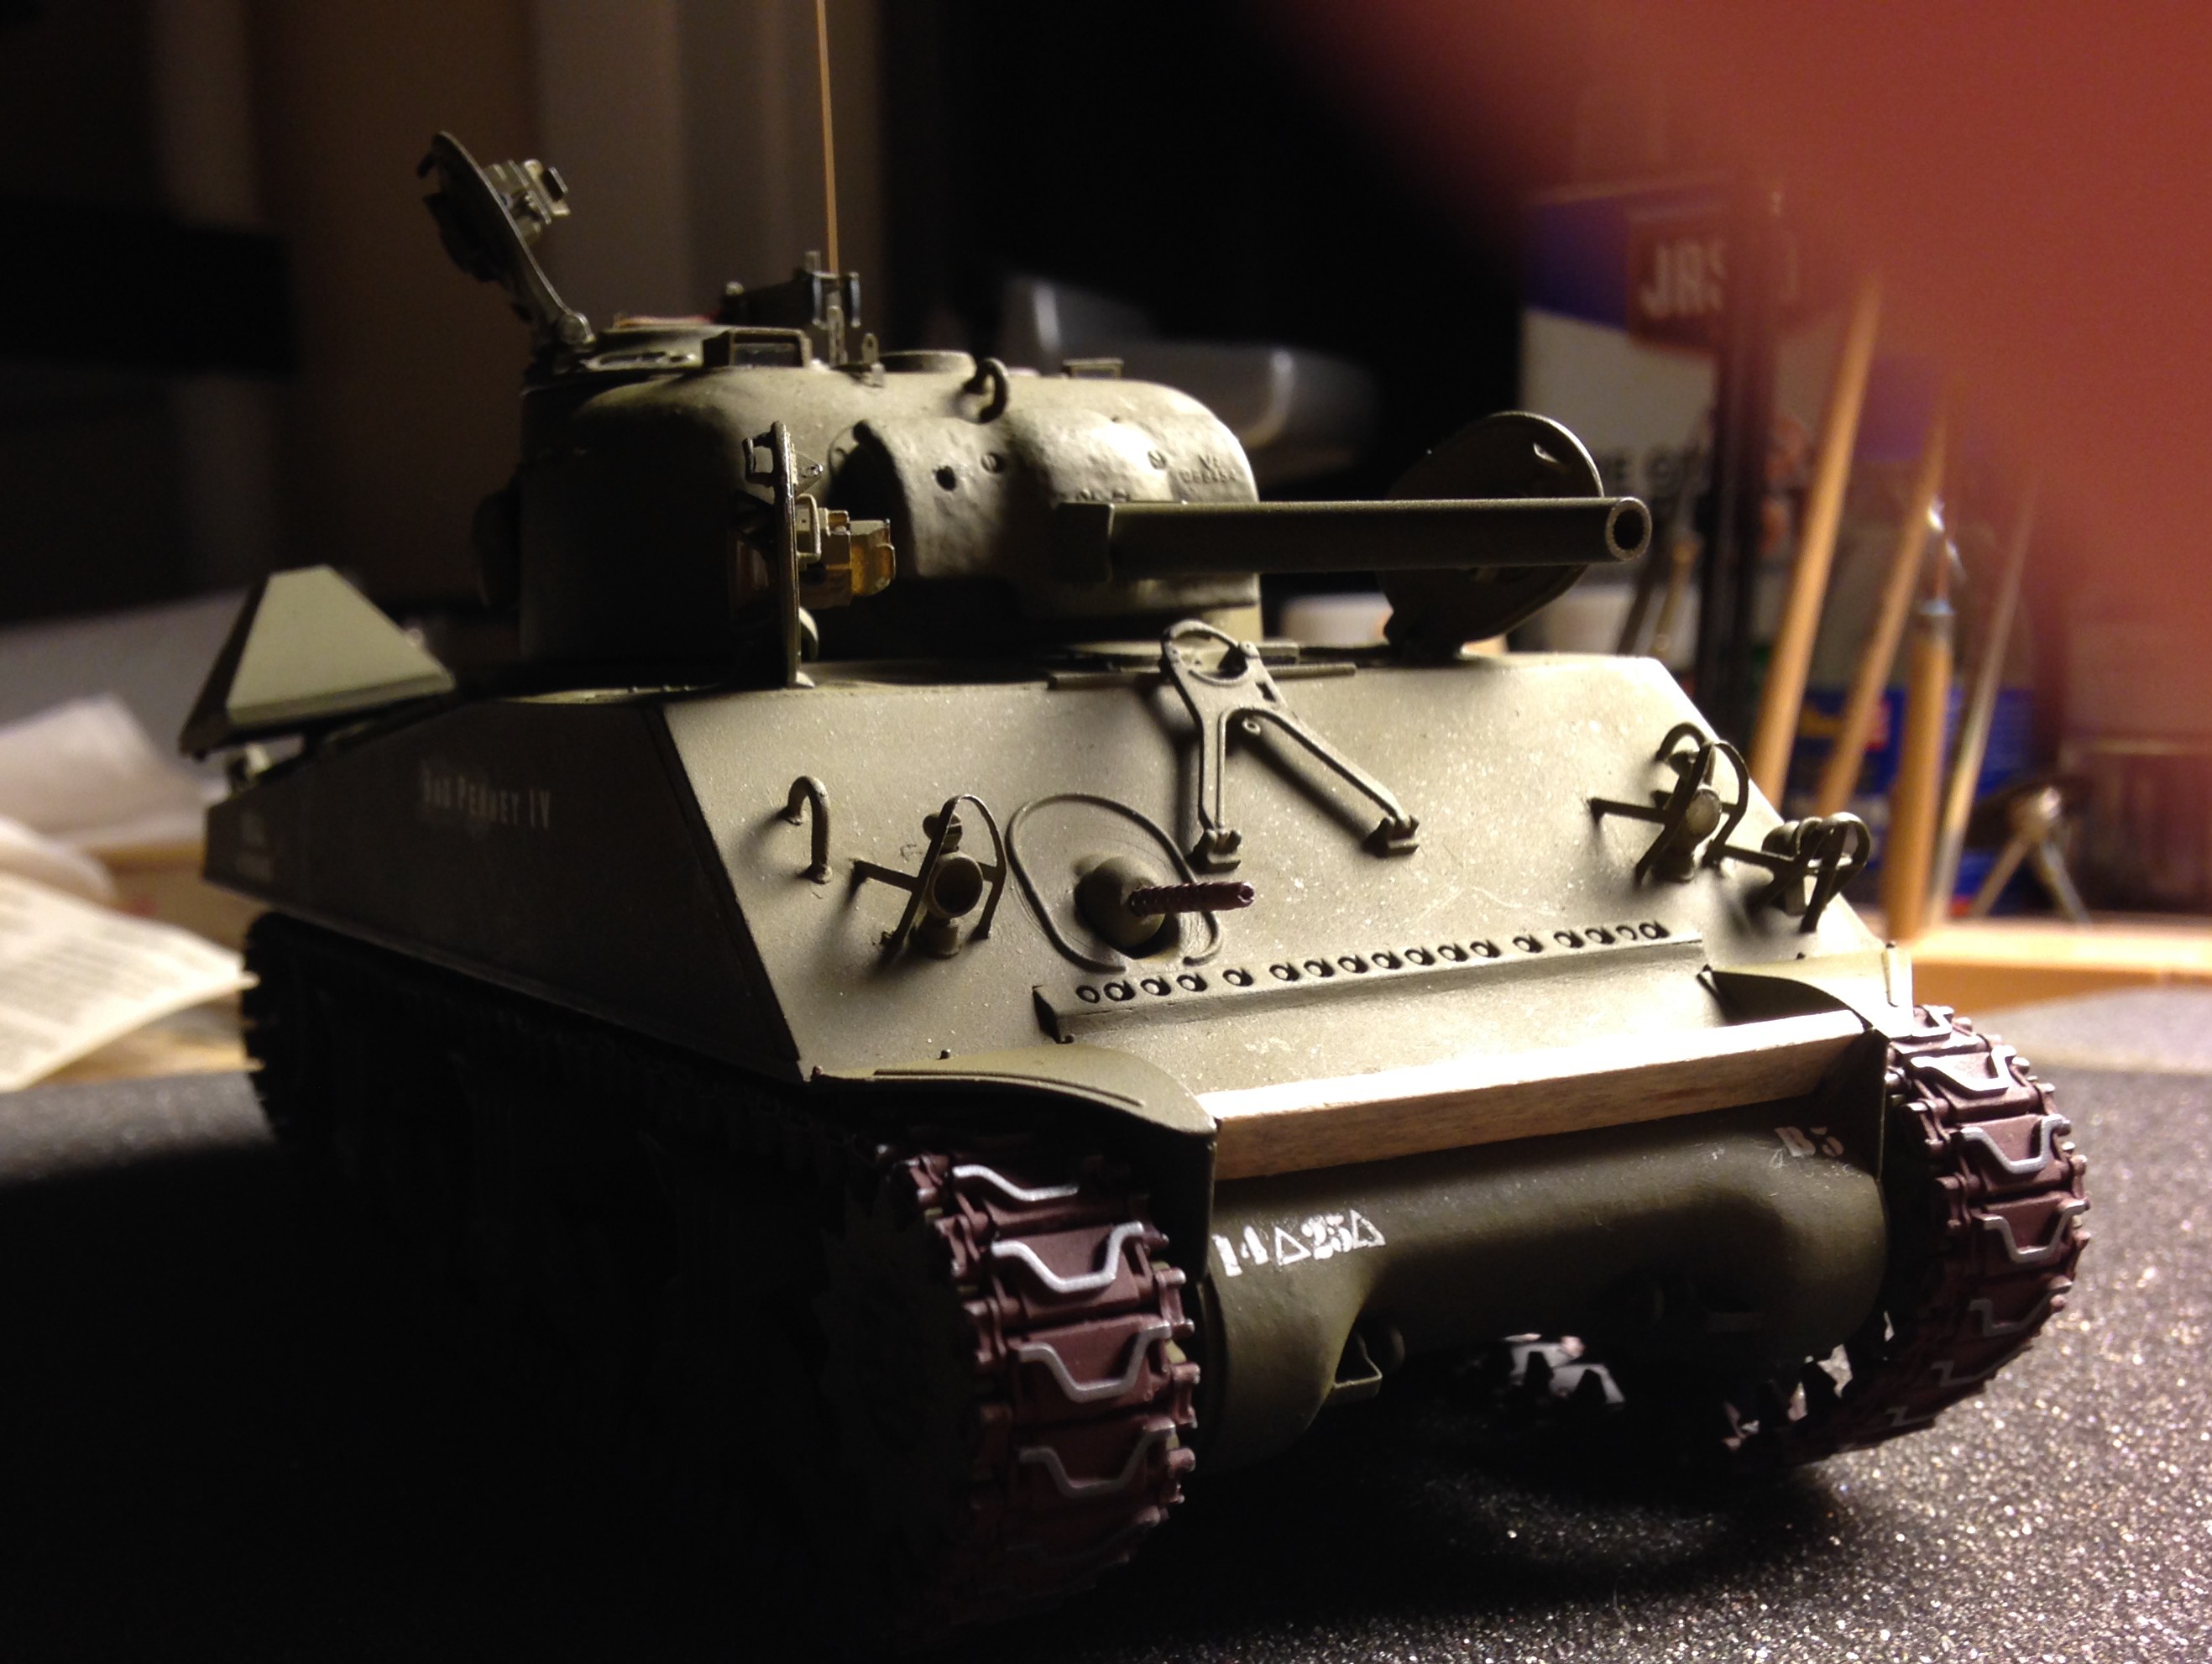
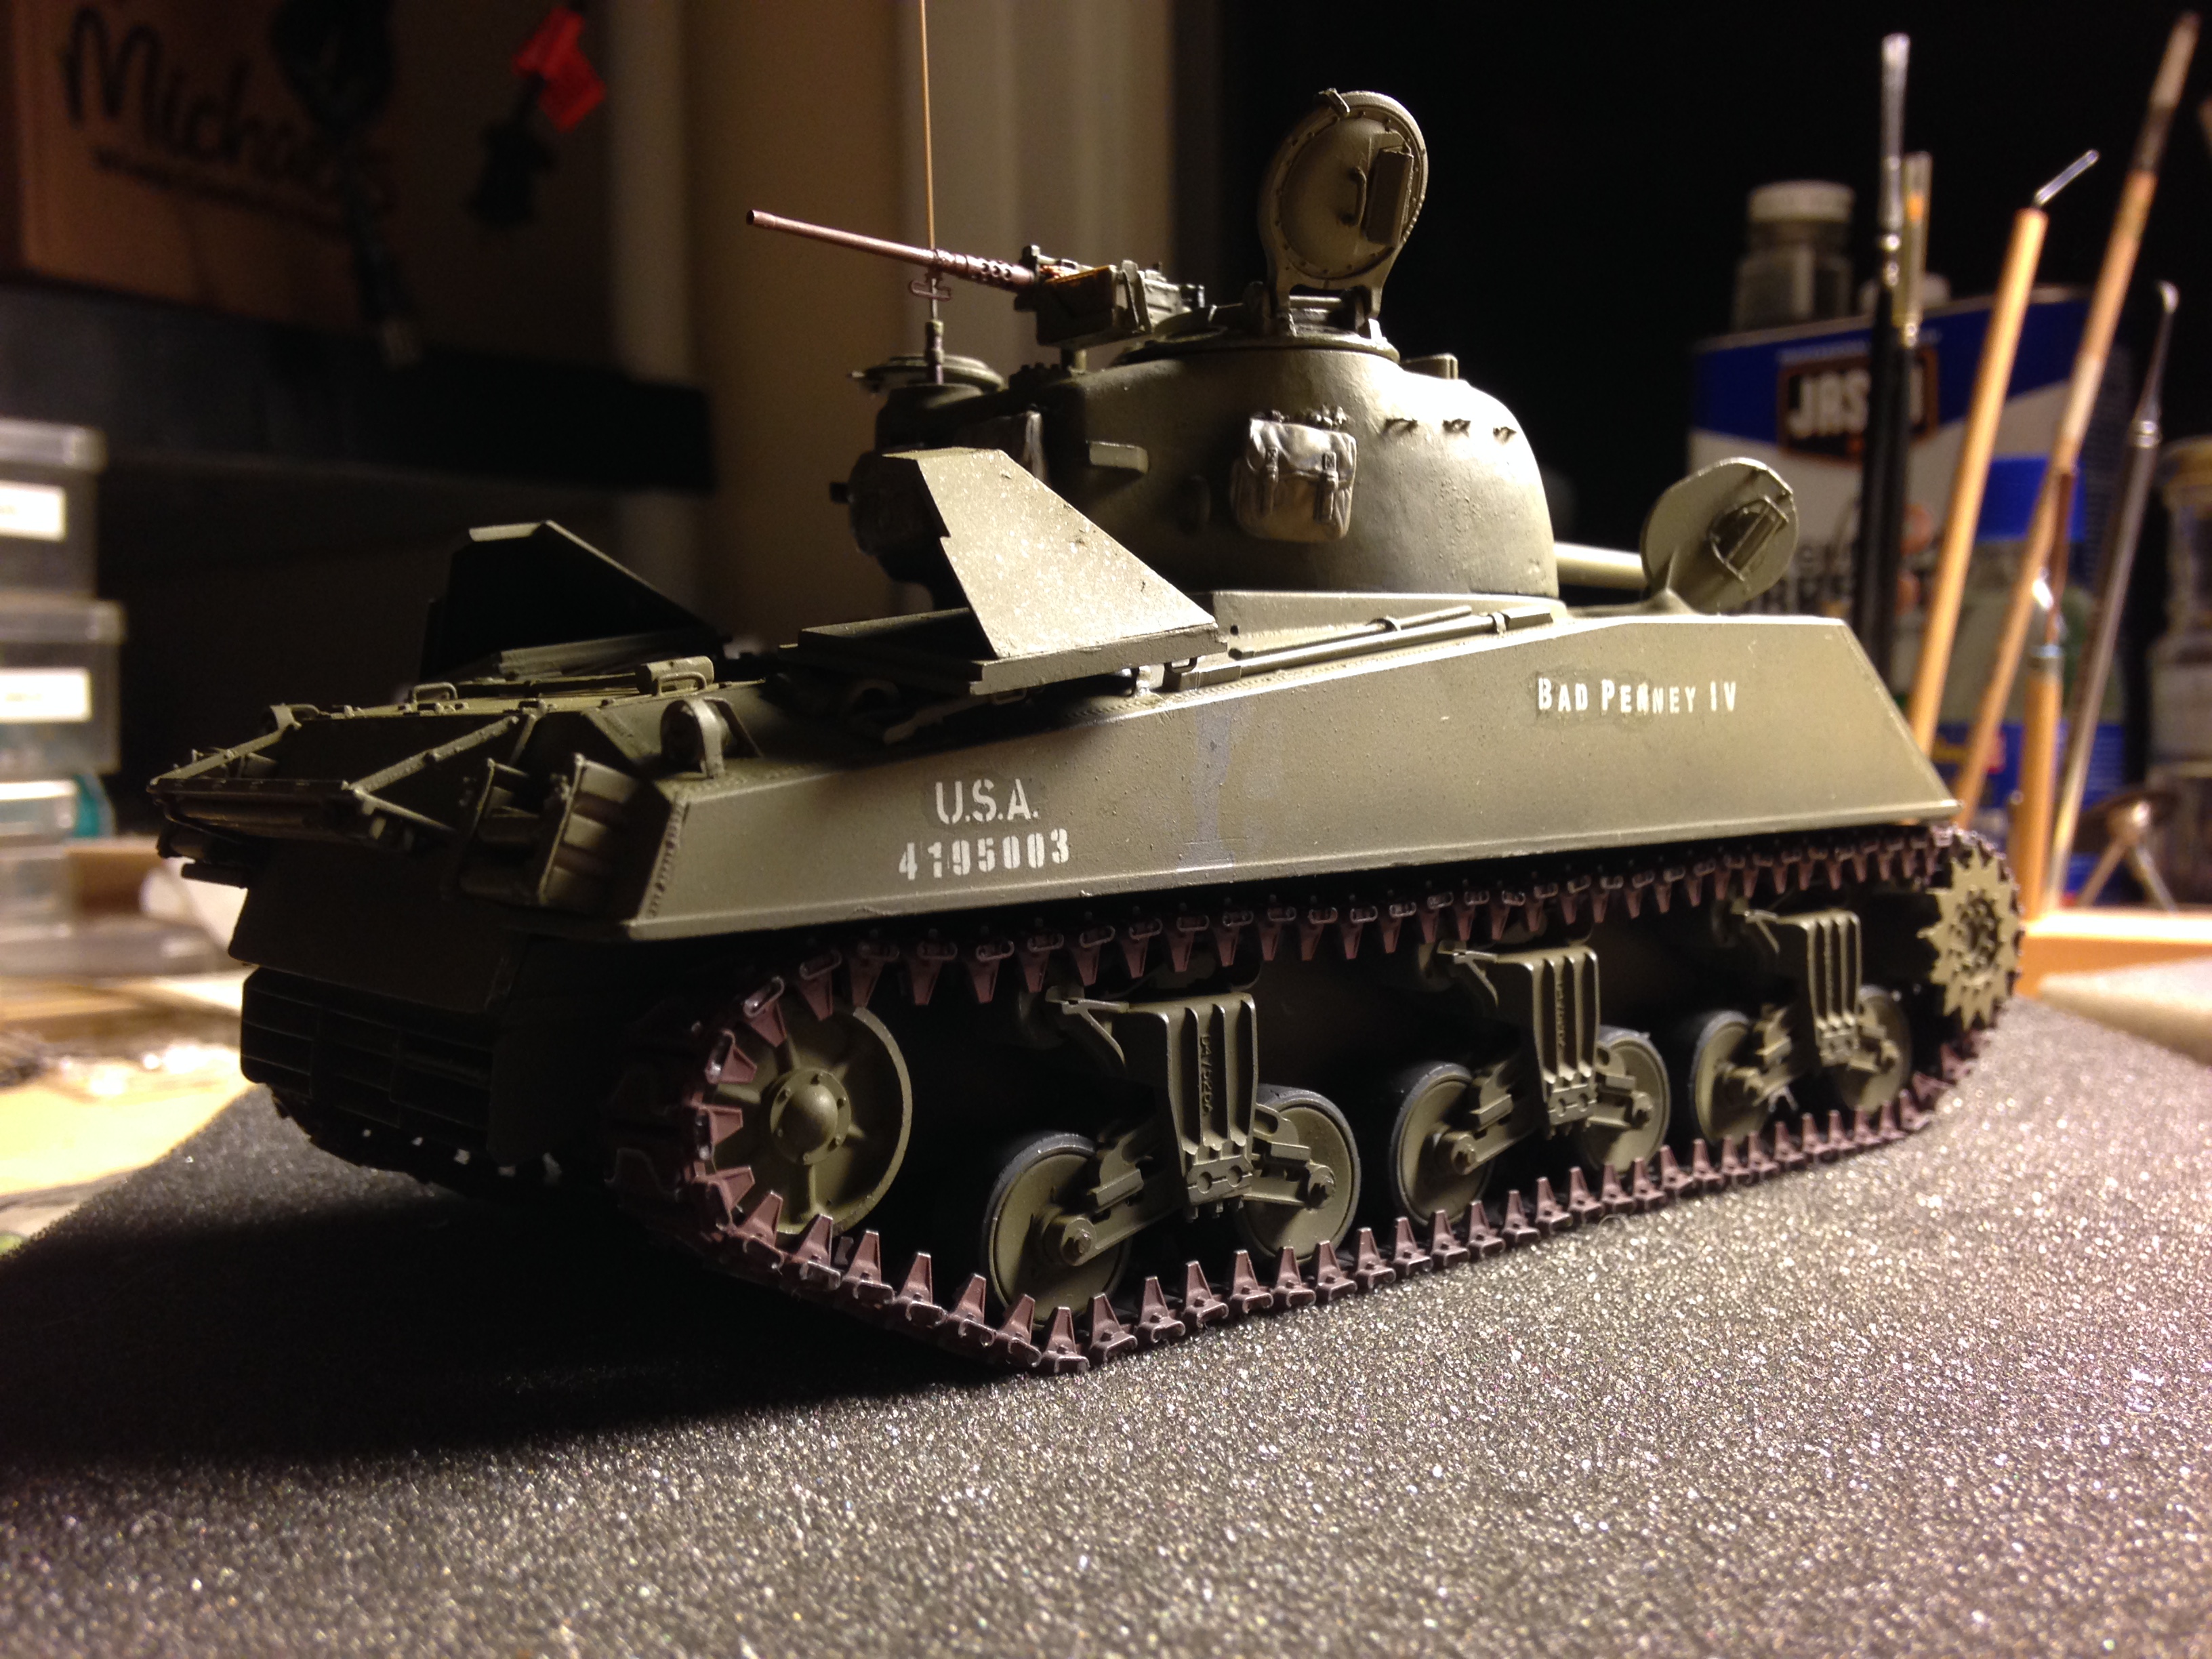
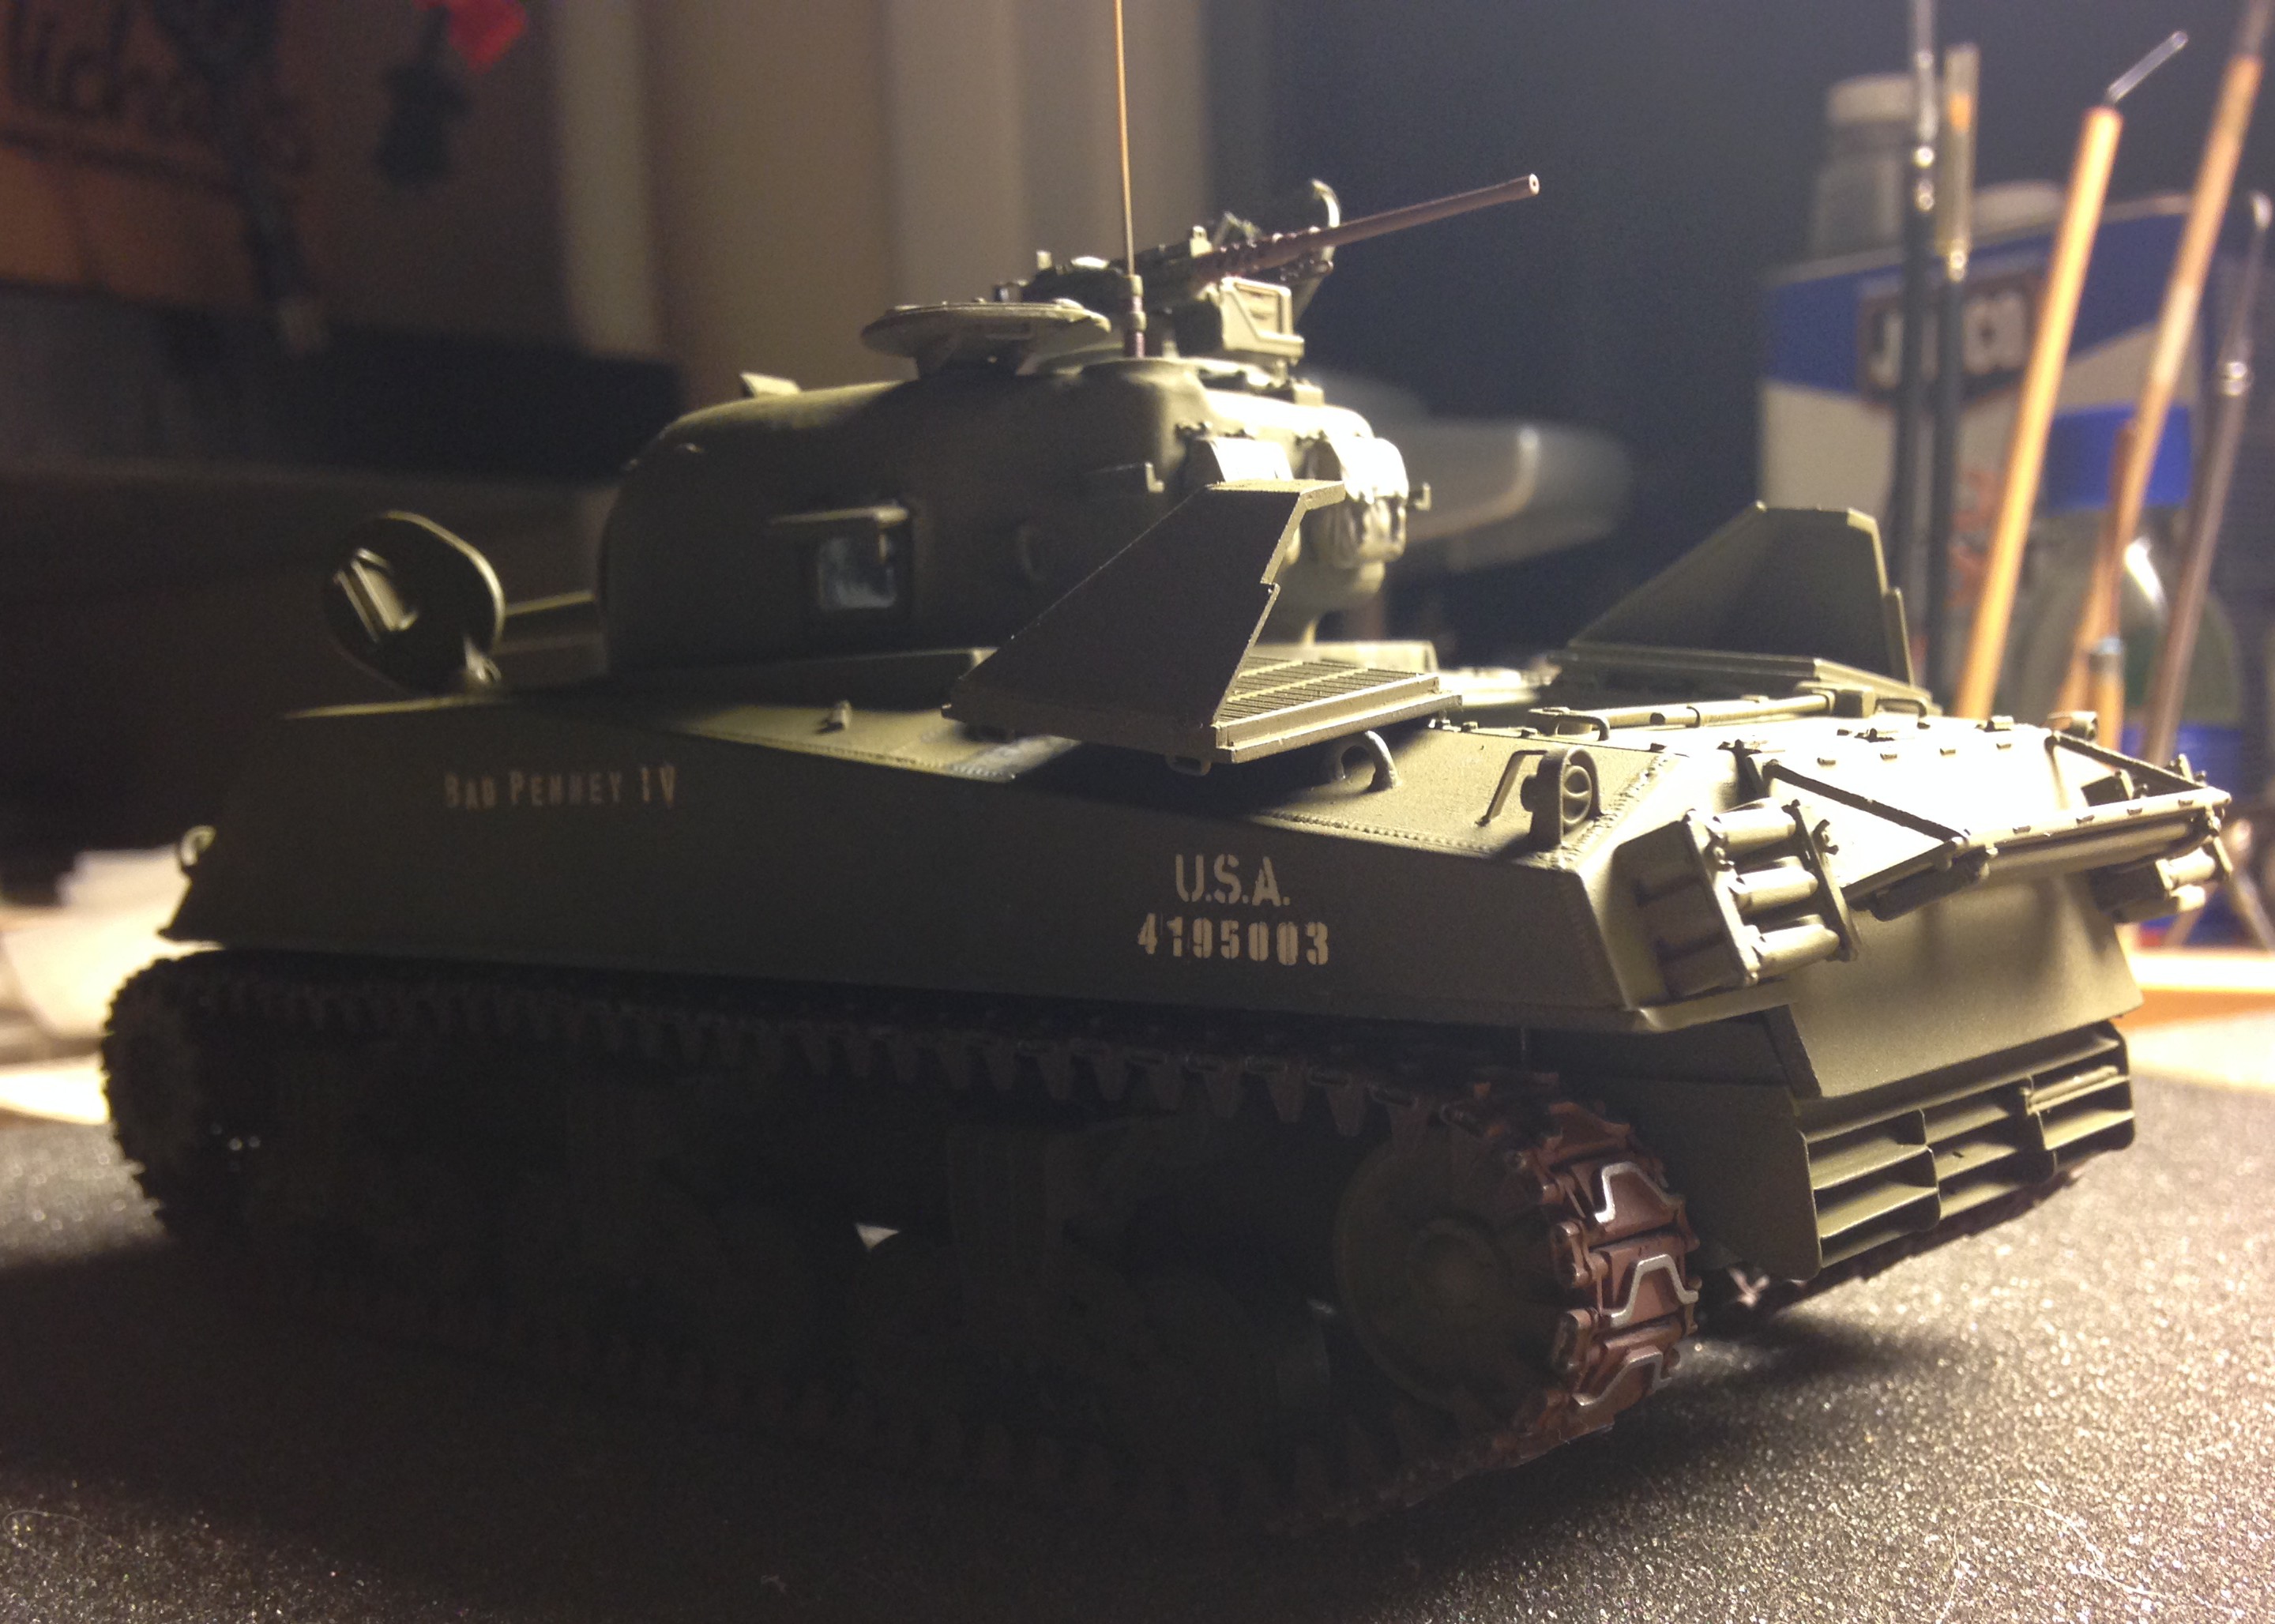
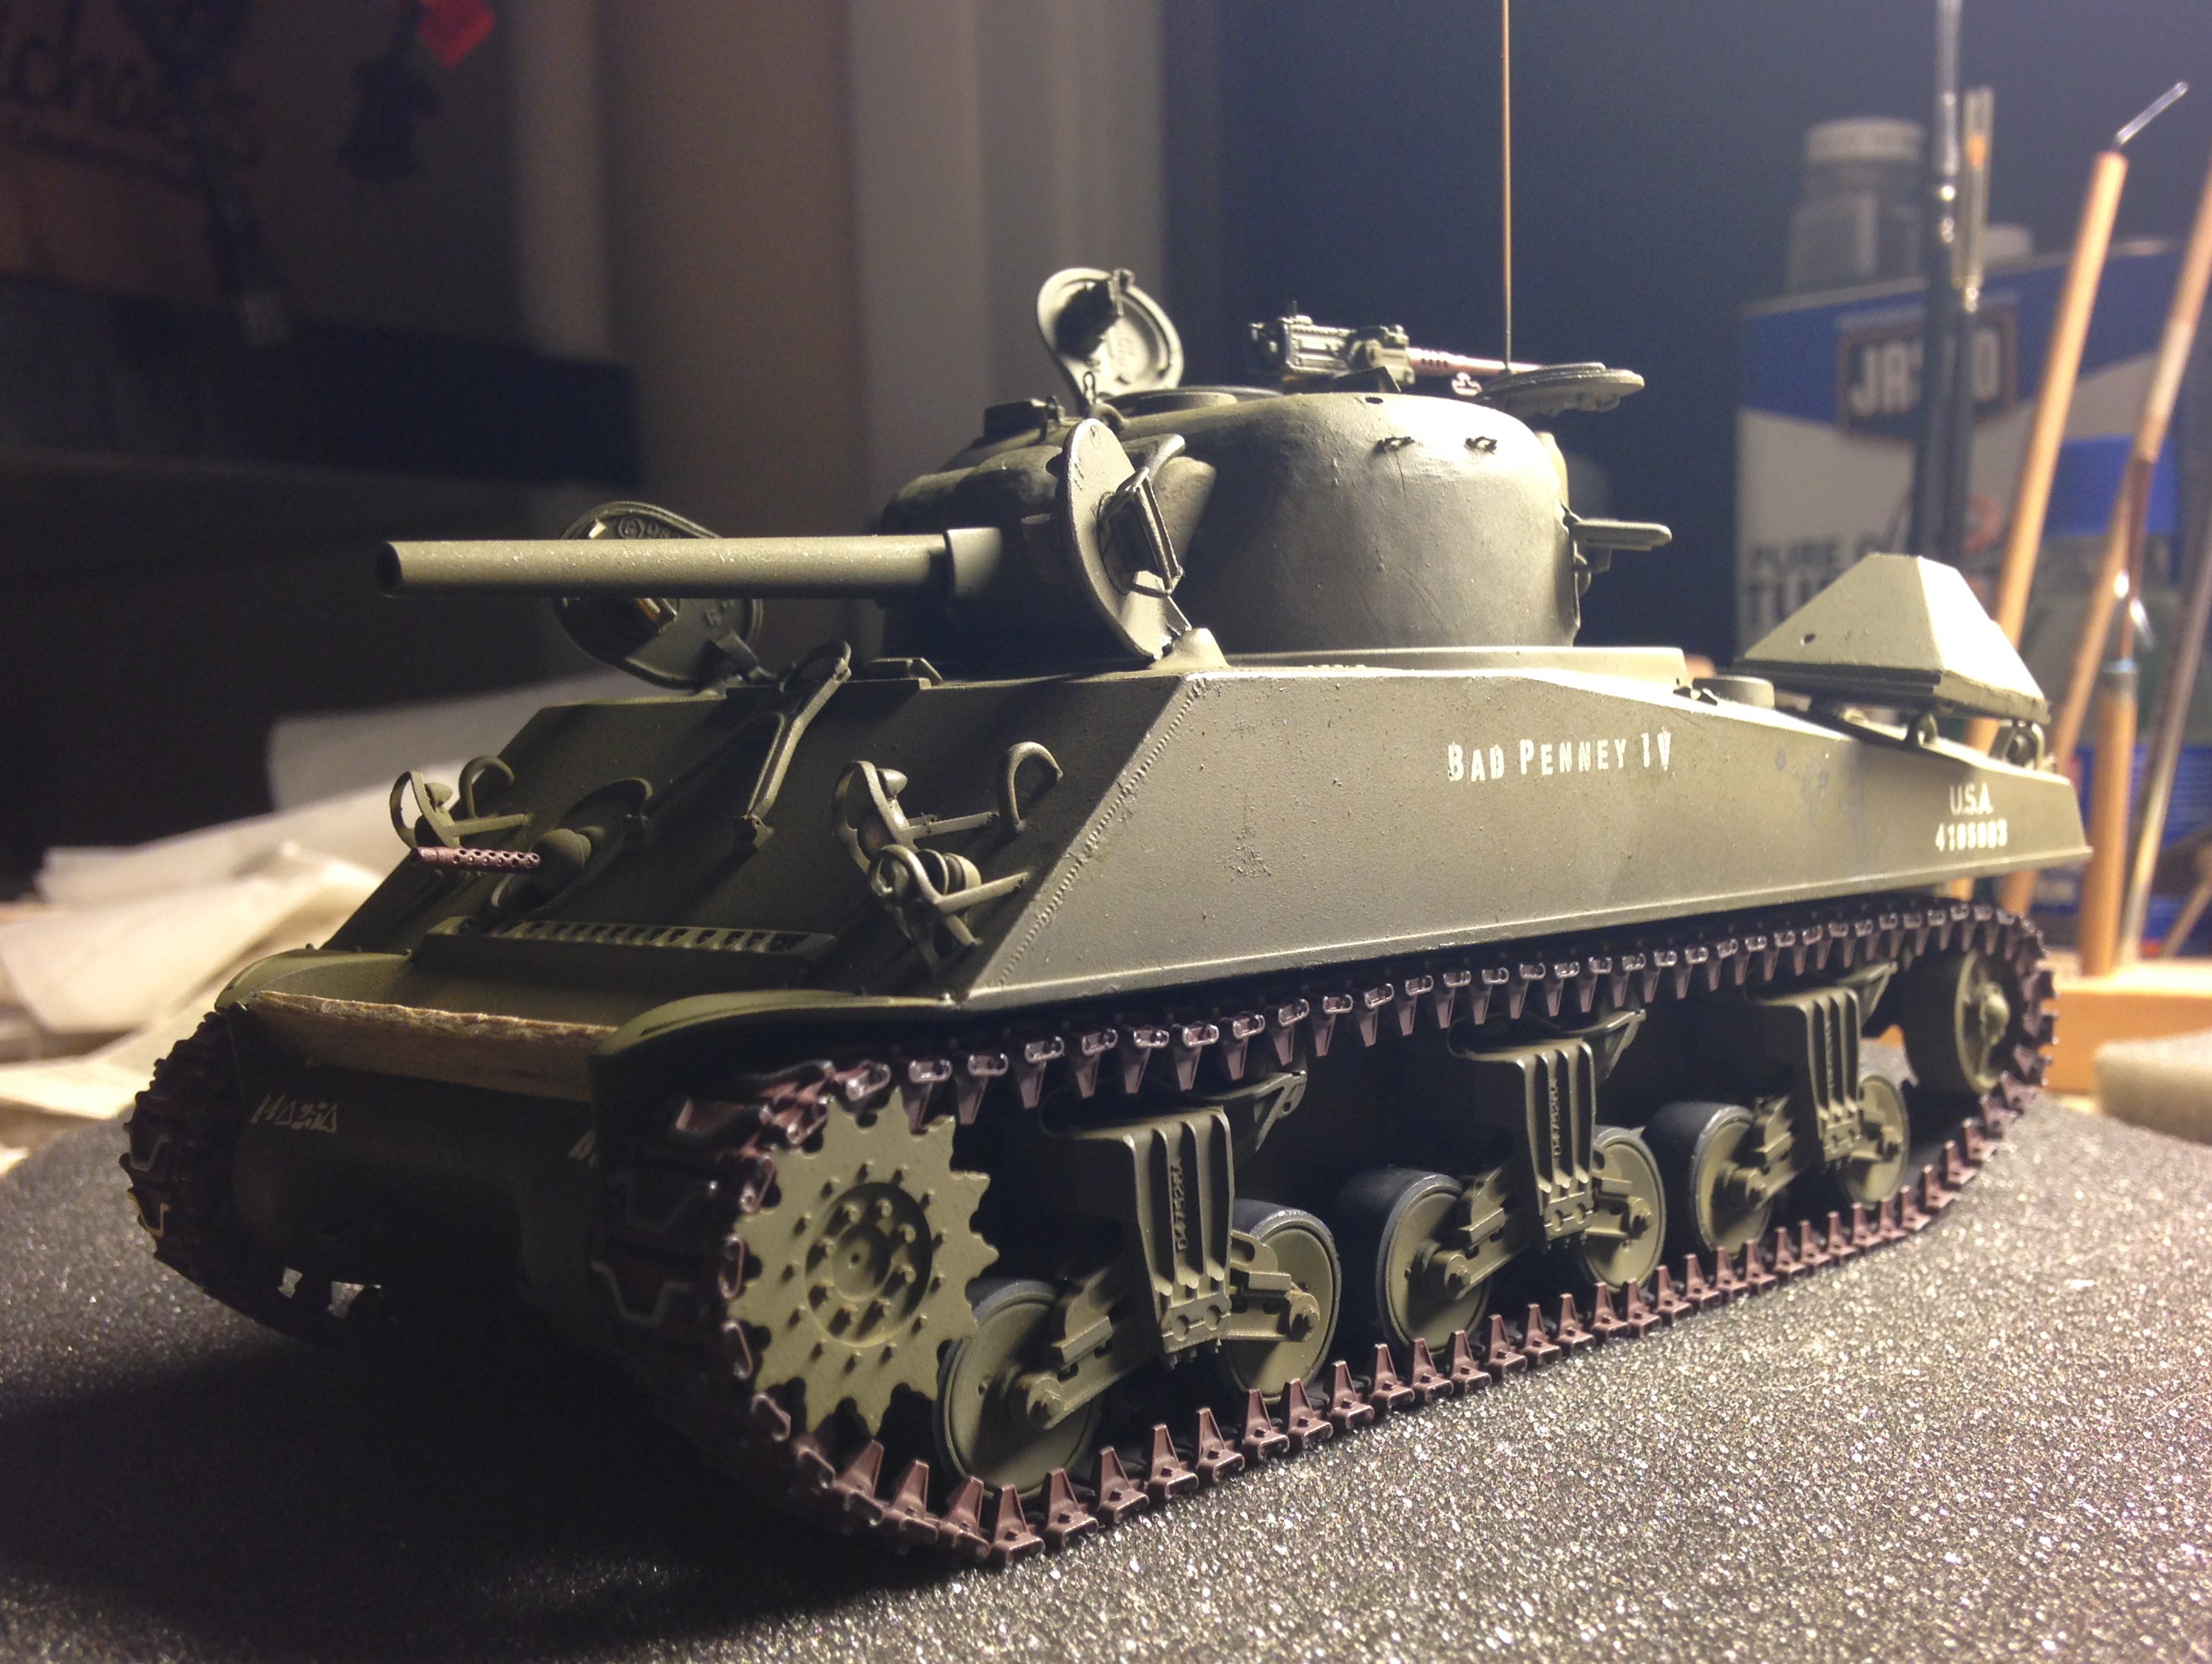
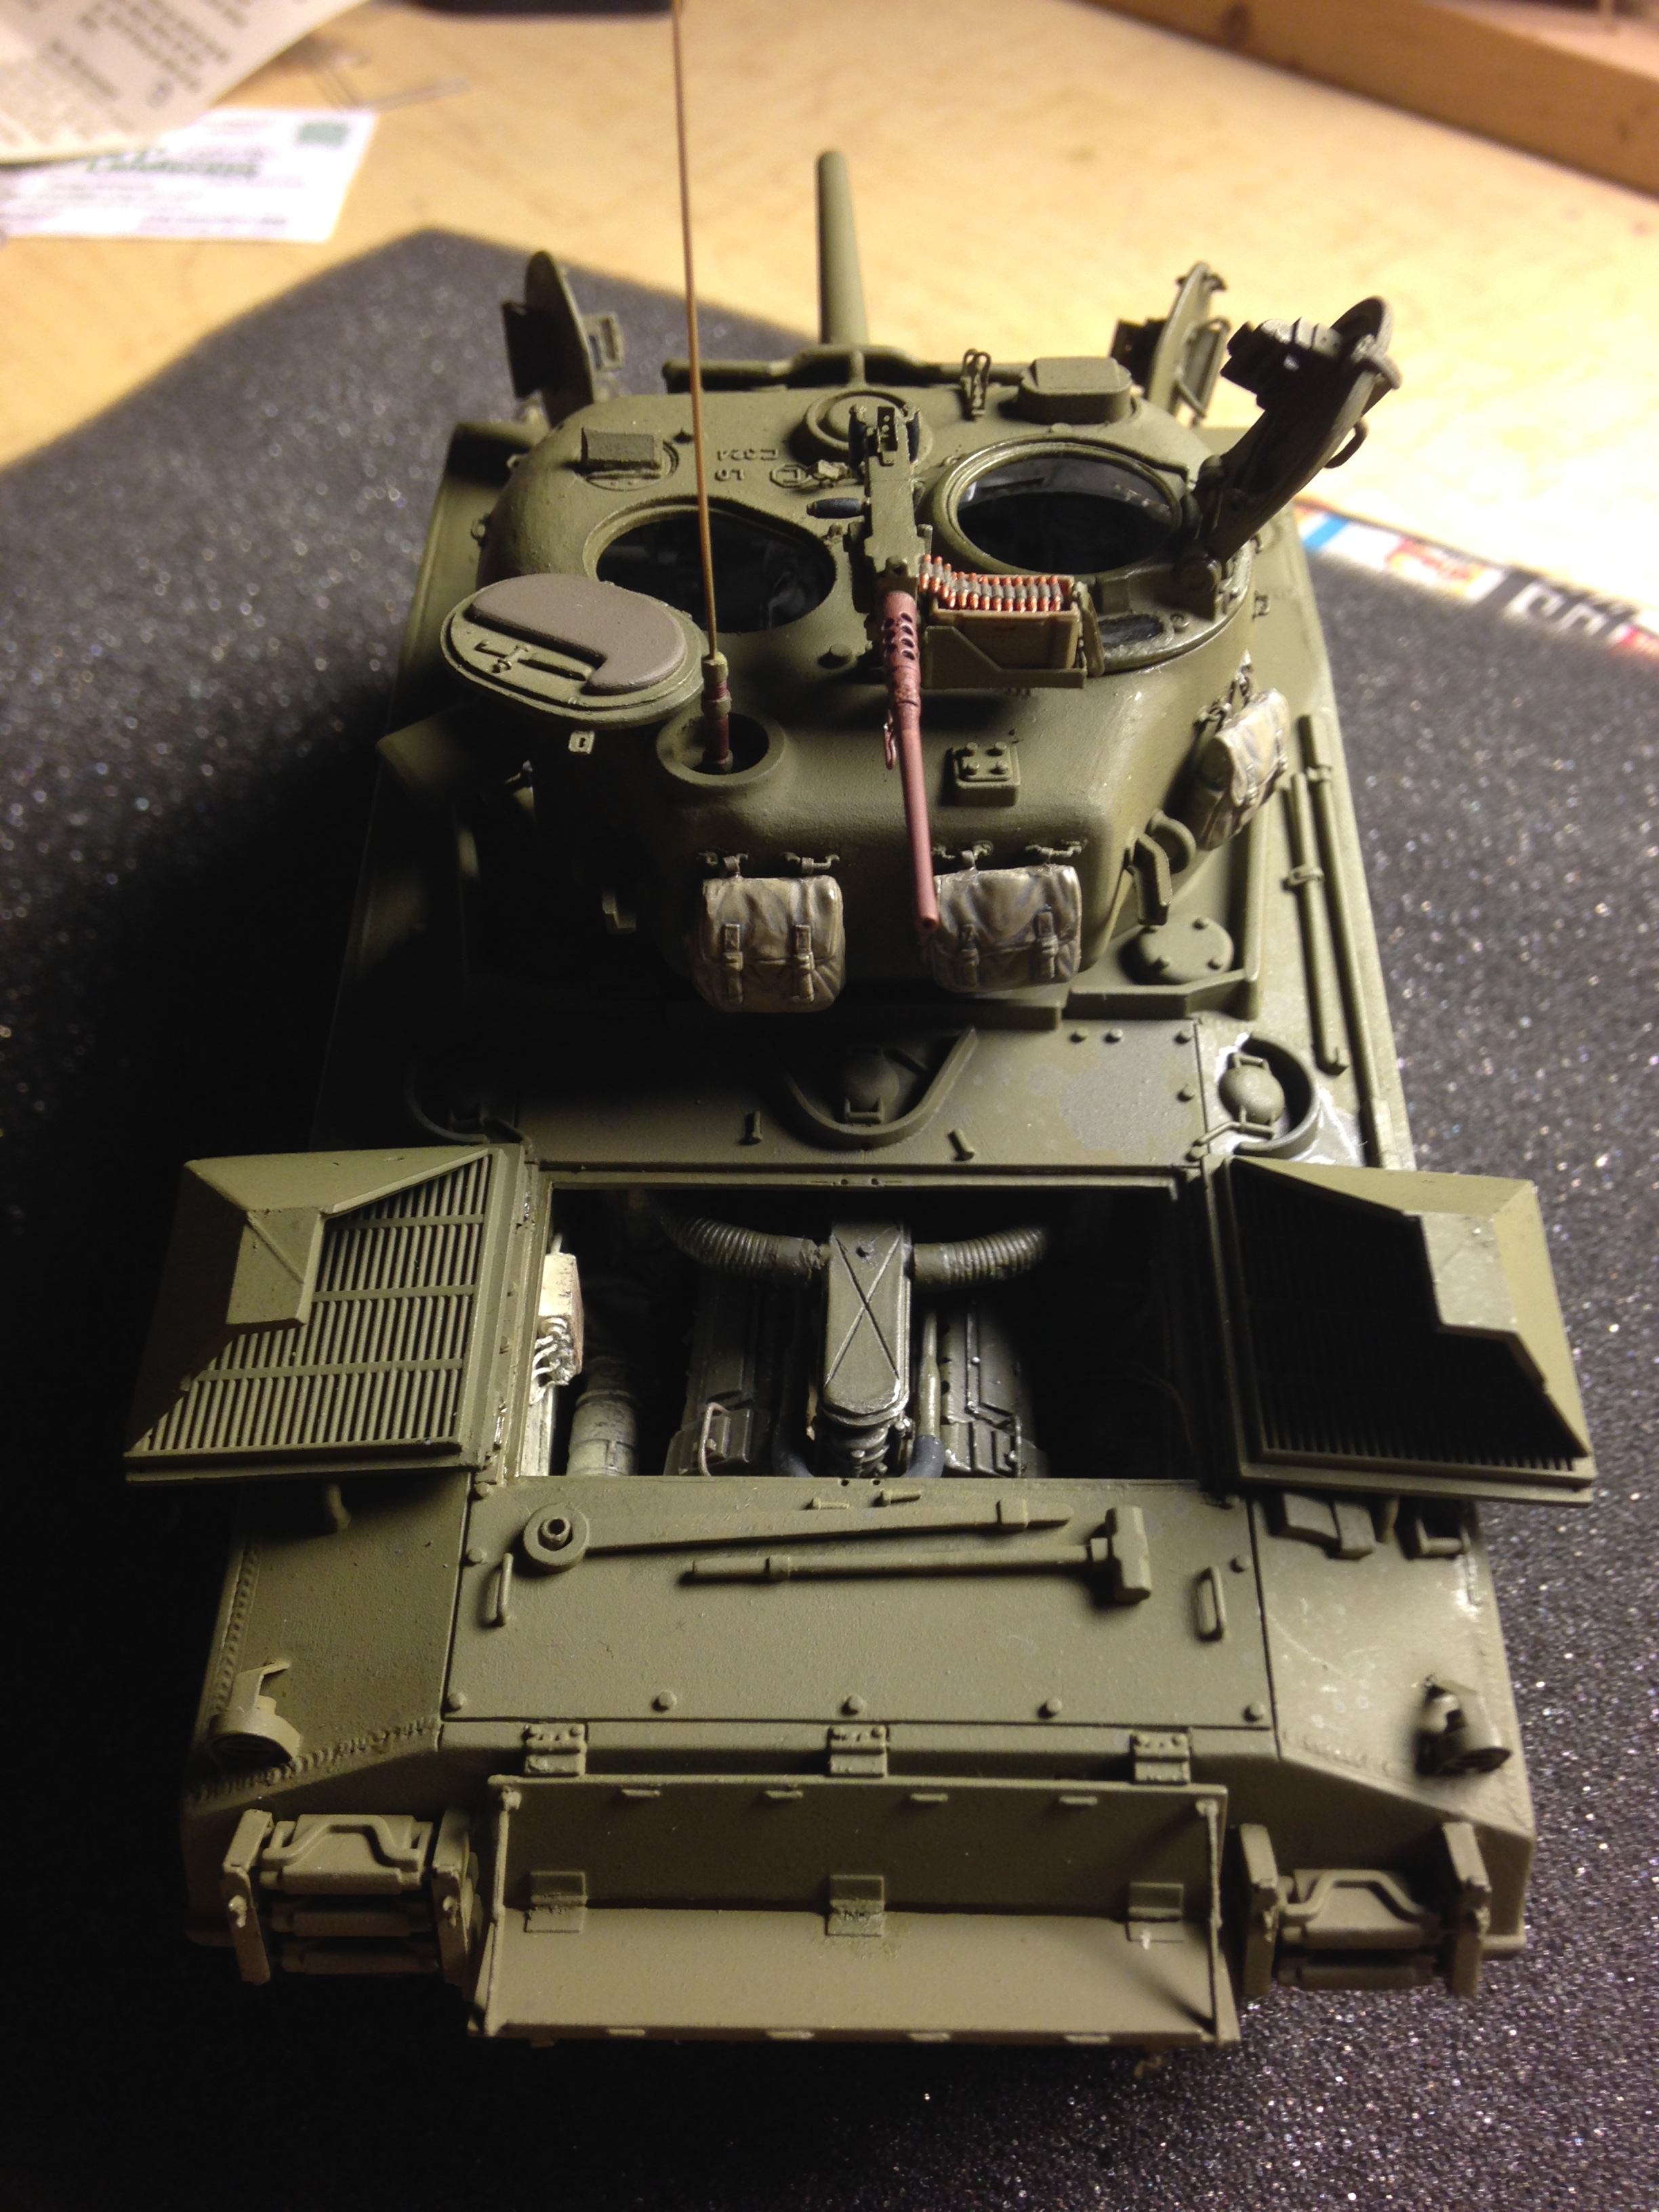
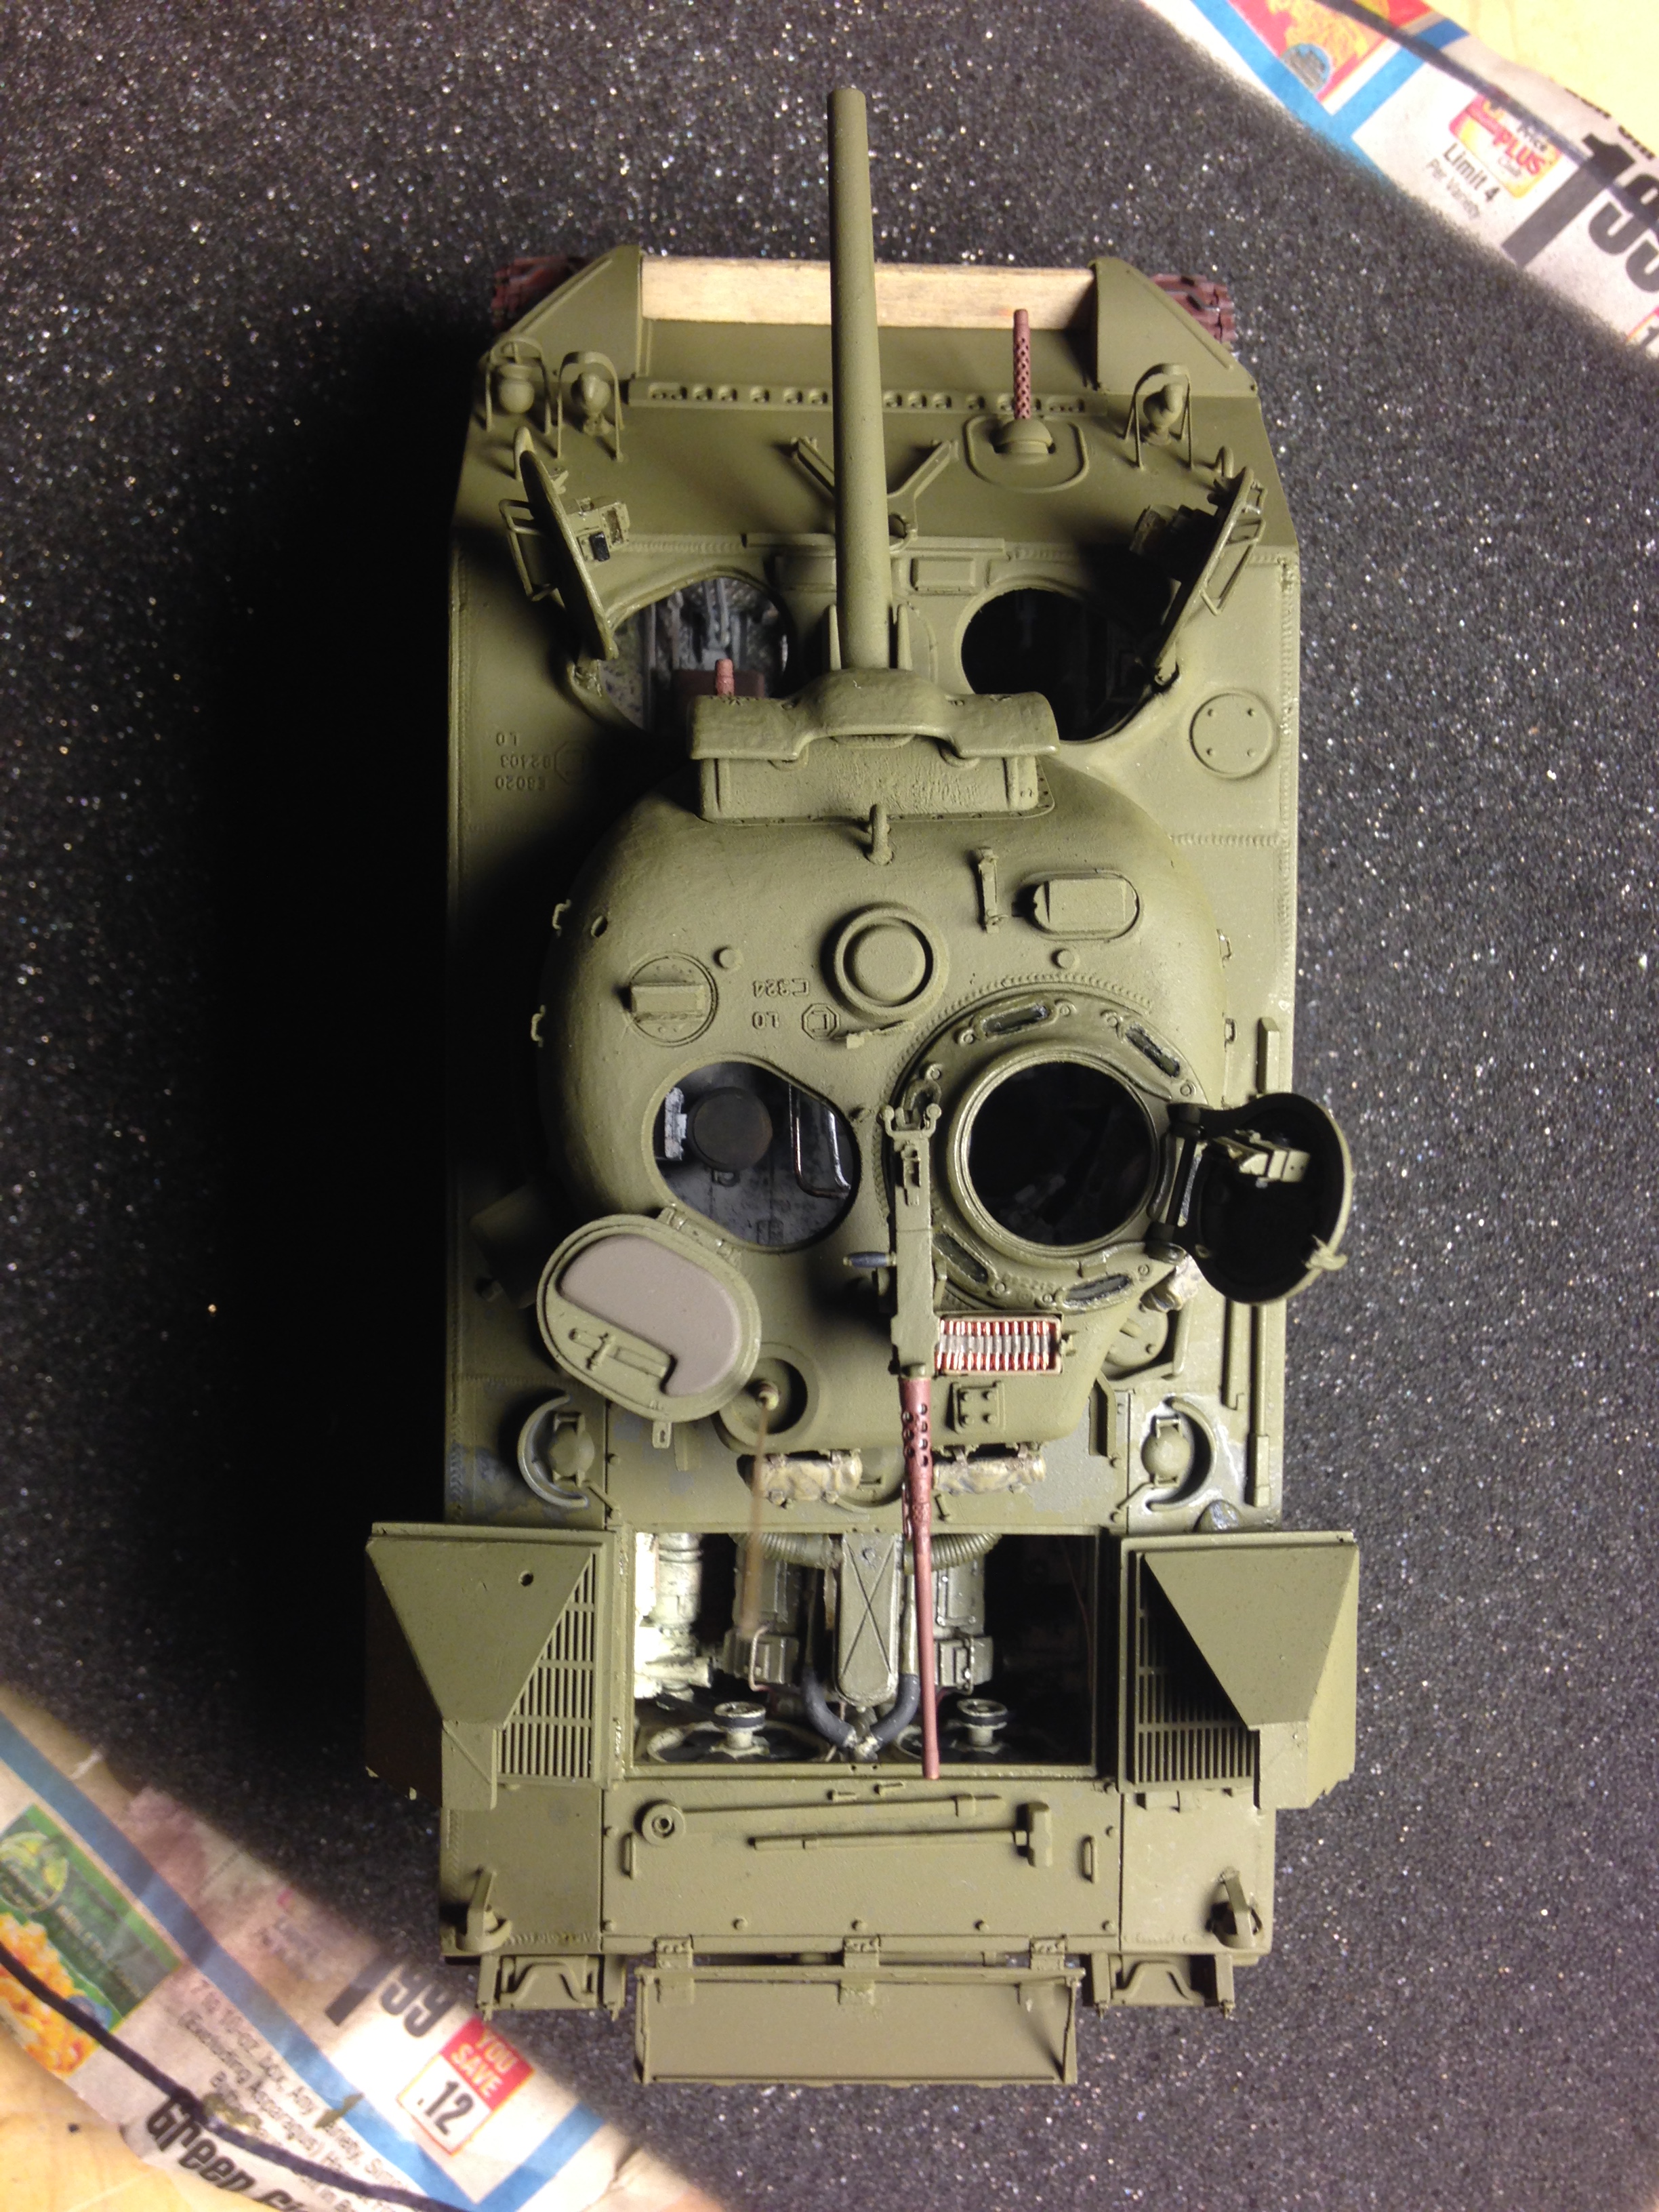
Short on words, long on pictures, the only thing left to do now is to weather, stain, and dirty it up a bit and add some stowage:
- Home
- Gallery
- Two OLD builds
- Gemini (Revell) 1/24 scale
- FT17 (Meng) 1/35 Scale
- M3 Stuart (Academy) 1/35 scale
- M24 Chaffee (Bronco) 1/35 scale
- Sherman M4A3 75(W) (Tamiya) 1/35 scale
- P-38F (Tamiya) 1/48 Scale
- P-51 (Accurate Miniatures) 1/48 Scale
- A-37B Dragonfly (Trumpeter) 1/48 scale
- SR-71A Blackbird (Testors) 1/48 scale
- Bugatti Type 35B (Monogram) 1/24 Scale
- Behind the Scenes
- Aircraft 1/48
- Jets
- A-37B Dragonfly (Trumpeter)
- Supertweet – A Brief Overview
- A-37B (Trumpeter) after-action report
- A-37B Dragonfly (Trumpeter) Build #1 – Parts layout and the start
- A-37B Dragonfly (Trumpeter) Build #2 – Cockpit Painting, Detailing, and Fuselage Assembly
- A-37B Dragonfly (Trumpeter) Build #3 – Working on the Engine Intakes and Exhausts and Confidence Bites Me on the Ass
- A-37B Dragonfly (Trumpeter) Build #4 – Wings are Assembled, Installed, and Smaller Items Go On
- A-37B Dragonfly (Trumpeter) Build #5 – Small Items Added and a HUD Wrestled With
- A-37B Dragonfly (Trumpeter) Build #6 – More Small Items Added and Ready for Paint
- A-37B Dragonfly (Trumpeter) Build #7 – Painting Begins
- A-37B Dragonfly (Trumpeter) Build #8 – Painting Concludes as Does Decaling
- A-37B Dragonfly (Trumpeter) Build #9 – Staining, More Painting, Final Assembly, and DONE
- SR-71 Blackbird (Testors)
- SR-71 Blackbird – A Brief Overview
- SR-71A Blackbird (Testors) after-action report
- SR-71A Blackbird (Testors) Build #1 – The parts and the nose landing gear bay
- SR-71A Blackbird (Testors) Build #2 – Some Nose Gear Details
- SR-71A Blackbird (Testors) Build #3 – Work on the Cockpits and Canopies
- SR-71A Blackbird (Testors) Build #4 – More Work on the Cockpits, Canopies, and Scribing Lines
- SR-71A Blackbird (Testors) Build #5 – Continuing Work on the Cockpits
- SR-71A Blackbird (Testors) Build #6 – Wrapping Up the Cockpits
- SR-71A Blackbird (Testors) Build #7 – Painting and Installing Cockpits
- SR-71A Blackbird (Testors) Build #8 – Back to the Nose Gear Bay
- SR-71A Blackbird (Testors) Build #9 – Nose Gear Bay Gets Populated & Scribing “Fun”
- SR-71A Blackbird (Testors) Build #10 – Some Fuselage Details & the Nose Gear Gets Built
- SR-71A Blackbird (Testors) Build #11 – Starting the Main Landing Gear Bays
- SR-71A Blackbird (Testors) Build #12 – Starting the Main Landing Gear
- SR-71A Blackbird (Testors) Build #13 – Main Landing Gear Continues; Bays Get Stuff Stuffed
- SR-71A Blackbird (Testors) Build #14 – Bays and Main Landing Gear Done For Now
- SR-71A Blackbird (Testors) Build #15 – Fuselage Gets Assembled and I Get a Right Proper Scare
- SR-71A Blackbird (Testors) Build #16 – Fuselage Gets Tedious Attention
- SR-71A Blackbird (Testors) Build #17 – Fuselage Tedium Continues…as Does Another Scare
- SR-71A Blackbird (Testors) Build #18 – Fuselage Tedium Continues…With a Much-appreciated Detour on the Engine Nacelles
- SR-71A Blackbird (Testors) Build #19 – Engine Nacelles Get Some Attention
- SR-71A Blackbird (Testors) Build #20 – Engine Nacelles Done and Afterburners Added
- SR-71A Blackbird (Testors) Build #21 – A Myriad of Small Tasks to Ready the Build for Paint
- SR-71A Blackbird (Testors) Build #22 – Not Quite a Myriad of Small Tasks and Ready for Paint
- SR-71A Blackbird (Testors) Build #23 – Not Quite Ready for Paint and Decals Kick My Ass
- SR-71A Blackbird (Testors) Build #24 – Not Quite Ready for “Good Enough” & I kick back
- SR-71A Blackbird (Testors) Build #25X – A Pause in the Action
- SR-71A Blackbird (Testors) Build #26 – Wherein the Action Resumes and I am Reminded of Things One Should NOT Forget…Ever
- SR-71A Blackbird (Testors) Build #27 – The Best-laid Mice of Plans and Men
- SR-71A Blackbird (Testors) Build #28 – The Homestretch and the Finish
- A-37B Dragonfly (Trumpeter)
- Propeller-driven
- P-38F – Tamiya
- P-51 – Accurate Miniatures
- Mustang – A Brief Overview
- P-51 (Accurate Miniatures) after-action report
- P51 (Accurate Miniatures) Build #1 – Parts Layout, Copying Parts, and Wing Modification
- P51 (Accurate Miniatures) Build #2 – Working Cockpit Parts, Adding Details
- P51 (Accurate Miniatures) Build #3 – Scratchbuilding Landing Gear Bays and Readying Them for Molding
- P51 (Accurate Miniatures) Build #4 – Casting Landing Gear Bay in Resin, Fixing Errors, Adding Details
- P51 (Accurate Miniatures) Build #5 – Cockpit Work
- P51 (Accurate Miniatures) Build #6 – Fixing Cockpit Detail Errors, Canopy Fitting
- P51 (Accurate Miniatures) Build #7 – Cockpit Details and Painting, Landing Gear Bays Painted
- P51 (Accurate Miniatures) Build #8 – Cockpit Details, Molding Tailwheel, Detailing Main Landing Gear, Painting Landing Gear, Installing Cockpit, Joining Fuselage Halves
- P51 (Accurate Miniatures) Build #9 – Fixing Gaps, Making Landing Lights, Gun Details, Making More Accurate Flaps
- P51 (Accurate Miniatures) Build #10 – Flaps Finished, Formation Lights Built, Landing Gear Bays Attached, Wing Tops Attached
- P51 (Accurate Miniatures) Build #11 – Flap Problems, Wings, Elevators, Belly Scoop Attached
- P51 (Accurate Miniatures) Build #12 – Making Things Fit, Replacing Lost Details, Reworking Incorrect Panel Lines, Canopy Work
- P51 (Accurate Miniatures) Build #13 – Wrestling With Landing Lights, Replacing Propeller
- P51 (Accurate Miniatures) Build #14 – An Inattentive Error Sidelines the Build For Now
- P51 (Accurate Miniatures) Build #15 – Adventures in Forensic Modeling…Picking Up Where I Left Off
- P-51 (Accurate Miniatures) Build #16 – Painting, Final Details, and DONE
- Jets
- Spacecraft
- Actual
- Gemini Program – A Brief Overview
- Gemini (Revell) After-action Report
- Gemini (Revell) Build #1 – Parts layout and the start
- Gemini (Revell) Build #2 – Starting on the PE interior parts
- Gemini (Revell) Build #3 – Cleaning up exterior seams and more interior work
- Gemini (Revell) Build #4 – Interior work (and a bazillion little tiny switches)
- Gemini (Revell) Build #5 – Interior work; adding missing details on the seats
- Gemini (Revell) Build #6 – Interior work; finishing seat details and discovering major surgery is required to make them fit
- Gemini (Revell) Build #7 – Interior work; last seat details added and making harnesses
- Gemini (Revell) Build #8 – Adding interior details (most notably the artificial horizons), discovering the surgery and exterior were botched, fixing said botches
- Gemini (Revell) Build #9 – Fixing exterior details, adding washers & rivets, starting work on hatches
- Gemini (Revell) Build #10 – Finishing hatches and adding interior details
- Gemini (Revell) Build #11 – Finishing the instrument panel, adding more interior details, painting the interior
- Gemini (Revell) Build #12 – Finishing seat details, assembling the interior, discovering it doesn’t fit and fixing that, adding exterior resin details (and discovering they’re garbage), adding the retrorocket module
- Gemini (Revell) Build #13 – Discovering *more* garbage exterior details and fixing that, adding panels and rivets to the retro and service modules, first paint job which went horribly wrong and fixing *that*
- Gemini (Revell) Build #14 – Adding decals, fixing paint, opening hatches, fixing paint, fixing more garbage resin, fixing paint, building the display stand, and FINISHED
- Actual
- Armor
- Light Tanks
- FT-17 (Meng)
- Renault FT-17 – A Brief Overview
- FT17 (Meng) After-Action Report
- FT-17 (Meng) Build #1 – Parts Layout, Assembling Tracks, and Marking Time Awaiting Parts
- FT-17 (Meng) Build #2 – PE Parts Arrive and Time is Consumed with Small Parts
- FT-17 (Meng) Build #3 – The Interior Gets Paint & Things Start Going Together
- FT-17 (Meng) Build #4 – The Exterior Gets Paint & Things Really Start Going Together…and Done
- M3 Stuart (Academy)
- Stuart – A Brief Overview
- M3 Stuart (Academy) After-action Report
- M3 Stuart (Academy) Build #1 – Parts Layout, Assembling Tracks, and Making Resin Parts Fit
- M3 Stuart (Academy) Build #2 – Adding Rivets, Fixing a Mistake, LED Placement, and Backdating the Turret
- M3 Stuart (Academy) Build #3 – Finding a Home for the Battery and Getting Details Prepared for Paint
- M3 Stuart (Academy) Build #4 – Painting and Interior Assembly Begins and a Minor Tragedy Happens and is Fixed
- M3 Stuart (Academy) Build #5 – Dealing With Disappointing Fit and Tedious Details
- M3 Stuart (Academy) Build #6 – Dealing With Tedious Details and Being Adaptable
- M3 Stuart (Academy) Build #7 – Final Paint, Decals, Pastels, and DONE
- M24 Chaffee (Bronco)
- Chaffee – A Brief Overview
- M24 Chaffee (Bronco) after-action report
- M24 Chaffee (Bronco) 1/35 Scale Build #1 – The Parts and Hull Construction Begins
- M24 Chaffee (Bronco) 1/35 Scale Build #2 – Getting the Engines Ready for Paint
- M24 Chaffee (Bronco) 1/35 Scale Build #3 – Painting…Kind of
- M24 Chaffee (Bronco) 1/35 Scale Build #4 – Small Details…Many, and a Useful Track Trick.
- M24 Chaffee (Bronco) 1/35 Scale Build #5 – More Small Details
- M24 Chaffee (Bronco) 1/35 Scale Build #6 – Small Details Find a Home and More Small Details are Produced
- M24 Chaffee (Bronco) 1/35 Scale Build #7 – Finishing the Interior of the Turret, Gluing it Closed, and Some Hull Details
- M24 Chaffee (Bronco) 1/35 Scale Build #8 – Dealing With Suspension, Tracks, Adding LOTS of Small Details, Wrestling With Decals, and DONE!
- FT-17 (Meng)
- Medium Tanks 1/35 Scale
- M4 (Tamiya)
- M4 (Tamiya) Build #0 – Behind the Scenes of Behind the Scenes…What I Want to do Before I can do That
- M4 (Tamiya) Build #1 – Parts Layout and Thinking Crazy Thoughts…and Then Acting On Them
- M4 (Tamiya) Build #2 – Assembling Bits for the Lower Hull Continues and I Find Out That Proper Fit Will be Challenging
- M4 (Tamiya) Build #3 – Assembling Bits for the Lower Hull Continues and I Ponder Tamiya’s Willingness to Utterly Ignore the Underside of Things
- M4 (Tamiya) Build #4 – Assembling Bits for the Lower Hull Continues and I’m Reminded That Sometimes Things Work and Sometimes They Do Not
- M4 (Tamiya) Build #5 – Assembling the Lower Hull is Mostly Completed and then Painted, Stained, and Worn, the Upper Hull is Fitted, and I Finally Get to Fit the Engine Into the Lower Hull
- M4 (Tamiya) Build #6 – Finishing the Engine, Engine Bay, and Discovering That Another Clever Idea for the Turret Simply Will Not Work, and Then Figuring Out What to do Instead
- M4 (Tamiya) Build #7 – Finishing the Gimmick of See-Through Panels, Getting Started on the Turret Basket, and MAKING that Sodding Upper Hull Fit to the Lower Hull
- M4A3 (Tamiya)
- Sherman – A Brief Overview
- Tamiya M4A3 after-action report
- M4A3 (Tamiya) Build #1 – Parts Layout and Constructing the Engine
- M4A3 (Tamiya) Build #2 – Fixing the Radiator Bulkhead and Constructing the Engine
- M4A3 (Tamiya) Build #3 – Fixing Fit Problems and Dry-Fitting the Engine Bay
- M4A3 (Tamiya) Build #4 – Finishing the Radiator Bulkhead and Building Ducting
- M4A3 (Tamiya) Build #5 – Finishing the Ducting, Making the Rear Bulkhead Fit, and Filling Holes
- M4A3 (Tamiya) #6 – Dry-Fitting the Interior, Fixing Some Exterior Details, Adjusting Interior and Engine Bay Parts to Fit
- M4A3 (Tamiya) Build #7 – Fixing Warped Resin and Experimenting With Salt Chipping
- M4A3 (Tamiya) Build #8 – More Tiny Engine Details, Interior Construction Begins
- M4A3 (Tamiya) Build #9 – Reworking Front Hatches, Copying a Pistol Port, Cutting Away Engine Covers, Adding Engine Bay Details
- M4A3 (Tamiya) Build #10 – Correcting Exterior Details, Painting the Engine, Adding Wear to Road Wheels and Painting Them
- M4A3 (Tamiya) Build #11 – Experimenting with Staining, Adding Details to Interior Parts, and Painting Interior Parts
- M4A3 (Tamiya) Build #12 – Salt-Chipping and Painting Interior, Gluing and Staining the Interior, Adding and Painting the Engine Bay, Installing Engine, and Gluing Rear Bulkhead in Place
- M4A3 (Tamiya) Build #13 – Deciding on Front Hatches and Correcting Vent Cover
- M4A3 (Tamiya) Build #14 – Turret Work, Periscope Surgery, Grafting the Pistol Port to the Turret
- M4A3 (Tamiya) Build #15 Brass Machine Gun Barrels, “Fun” with the Bow Gun, More Periscope Surgery, Adding the Main Gun Barrel and Creating Trunion Mounts, Mantle Surgery, Many Turret Details
- M4A3 (Tamiya) Build #16 – Turret Interior Detailing, Painting, and Staining, Painting Misc. Details
- M4A3 (Tamiya) Build #17 Turret Painting, Assembling Commander’s Hatch & Cupola, Adding Turret Cheek Armor, Misc. Turret Exterior Details
- M4A3 (Tamiya) Build #18 – Turret Exterior Painted, Fixing Exterior Details, Building Tracks, Creating Vent Blower
- M4A3 (Tamiya) Build #19 – Detailing .50 Cal, Making Vent Assembly Mold, and Casting it
- M4A3 (Tamiya) Build #20 – Assembling Vent Blower and Installing it, Copying Turret Interior Parts, Working Exterior Details
- M4A3 (Tamiya) Build #21 – Installing Bow Gun, Attaching Hull Top and Making Exterior Details Fit
- M4A3 (Tamiya) Build #22 – Correcting Exterior Details, Fun with Track Links (Part 1)
- M4A3 (Tamiya) Build #23 – Readying the Exterior for Paint
- M4A3 (Tamiya) Build #24 – Adding Details and the First Coat of Primer
- M4A3 (Tamiya) Build #25 – Final Painting Begins
- M4A3 (Tamiya) Build #26 – Fun with Tracks (Part 2), Painting Exterior Details
- M4A3 (Tamiya) Build #27 – Tracks Finally Installed and Markings are Added
- M4A3 (Tamiya) Build #28 – Weathering and Staining
- M4A3 (Tamiya) Build #29 – Final Details added and Completion
- M4 (Tamiya)
- Light Tanks
- Aircraft 1/48
- Cars
- Bugatti Type 35B – Monogram
- Bugatti Type 35B – A Brief Overview
- Bugatti Type 35B (Monogram) After-Action Report
- Bugatti Type 35B (Monogram) Build #1 – Parts Layout and Getting Started
- Bugatti Type 35B (Monogram) Build #2 – With No Particular Build Order, I Wander All Over the Place…and Then REALLY Give Myself Something to Do
- Bugatti Type 35B (Monogram) Build #3 – Working With Really Small Details…and Then REALLY Give Myself Something to Do AGAIN
- Bugatti Type 35B (Monogram) Build #4 – More Frame Breakage and Repair, and Starting Bodywork
- Bugatti Type 35B (Monogram) Build #5 – Bodywork and More Bodywork, with Really Small Details to Provide Diversity
- Bugatti Type 35B (Monogram) Build #6 – The Cockpit Gets Attention, with PLENTY of Really Small Details to Provide Even More Diversity
- Bugatti Type 35B (Monogram) Build #7 – All the Tiny Details Leading Up to Paint
- Bugatti Type 35B Build #8 – All the Tiny Details Remaining are Wrestled With Leading to Assembly and DONE
- Bugatti Type 35B – Monogram
- Side Projects
- Opinions, Reviews, & Tips
- A Big, Steamy, Cup of Disappointment. My Experiences with Eduard’s Limited-Edition Early P-38 Kit. It Ain’t Pretty.
- A Word About How Tools Affect the Work
- Airbrushes
- Black Magick
- Build Philosophy and How To Learn
- Going From Point Z to Point A
- MiniArt #35321 Continental R975 Radial Tank Engine Review
- The Monsters
- Old Dog, New Tricks, and 3D Printing
- The Carpet Monster and the Interdimensional Portal
- Working Resin Aftermarket Sets
- What the Hell Does That Mean?
Recent Posts
- M4 (Tamiya) Build #7 – Finishing the Gimmick of See-Through Panels, Getting Started on the Turret Basket, and MAKING that Sodding Upper Hull Fit to the Lower Hull
- M4 (Tamiya) Build #6 – Finishing the Engine, Engine Bay, and Discovering That Another Clever Idea for the Turret Simply Will Not Work, and Then Figuring Out What to do Instead
- M4 (Tamiya) Build #5 – Assembling the Lower Hull is Mostly Completed and then Painted, Stained, and Worn, the Upper Hull is Fitted, and I Finally Get to Fit the Engine Into the Lower Hull
- M4 (Tamiya) Build #4 – Assembling Bits for the Lower Hull Continues and I’m Reminded That Sometimes Things Work and Sometimes They Do Not
- Black Magick
Looking damn good.
LikeLike
Thanks! I started the project looking to refresh skill I haven’t used in a couple of decades. The project CERTAINLY did that!
LikeLike
Impressive!
LikeLike
Thanks! Now I’m gearing up for the next build. P51, Allison engine.
LikeLike